4、依赖注入
https://qhao1024.blog.csdn.net/article/details/105434739
4、依赖注入
相关信息
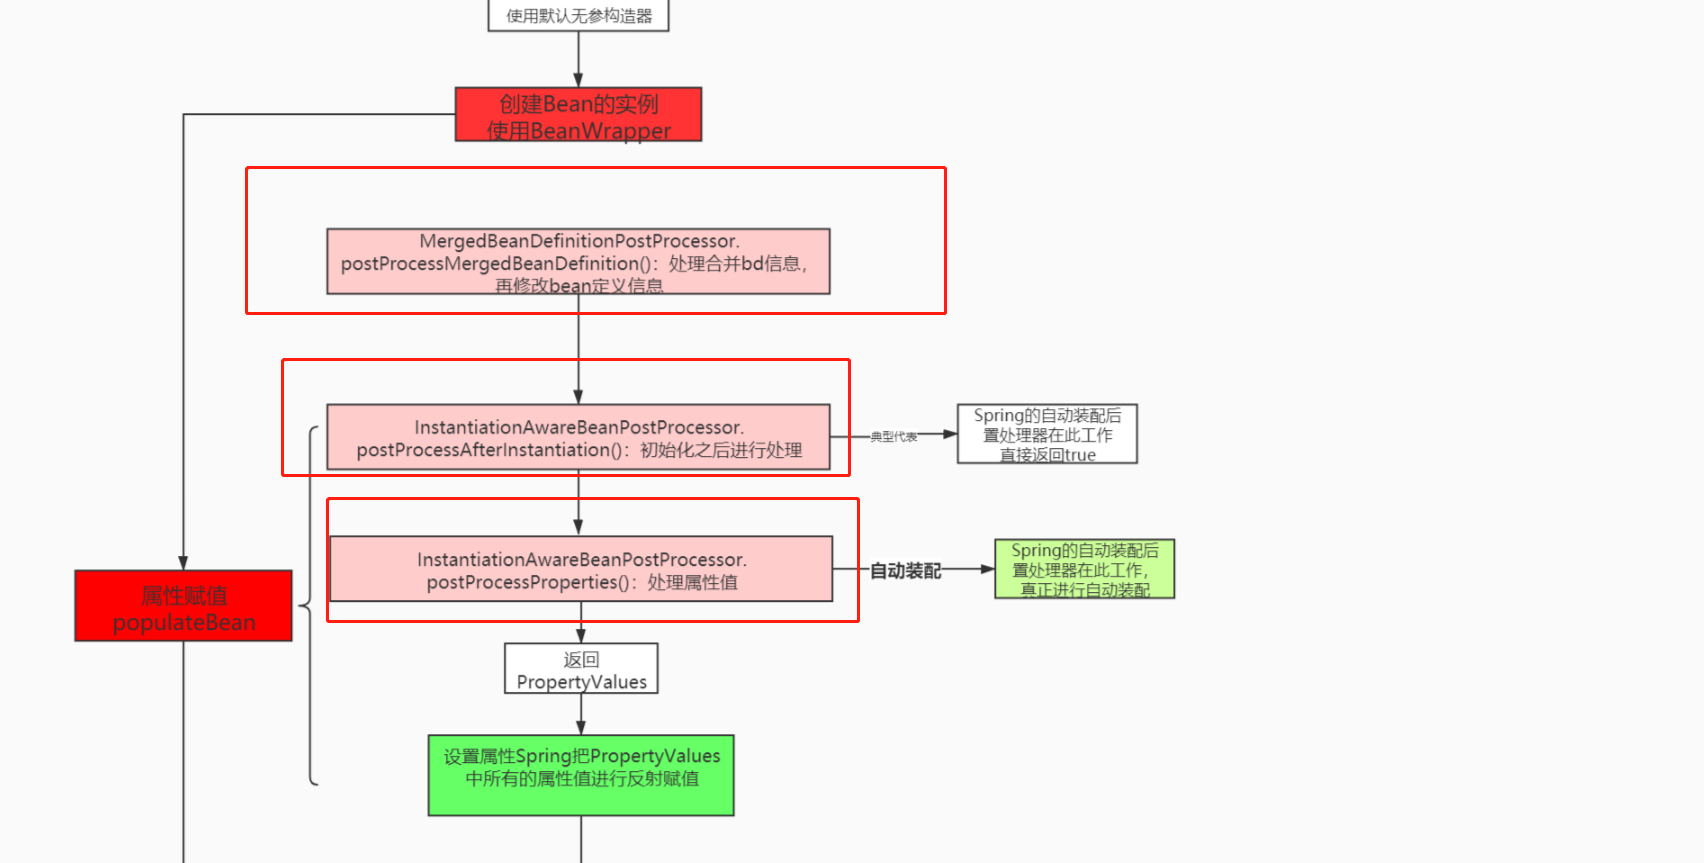
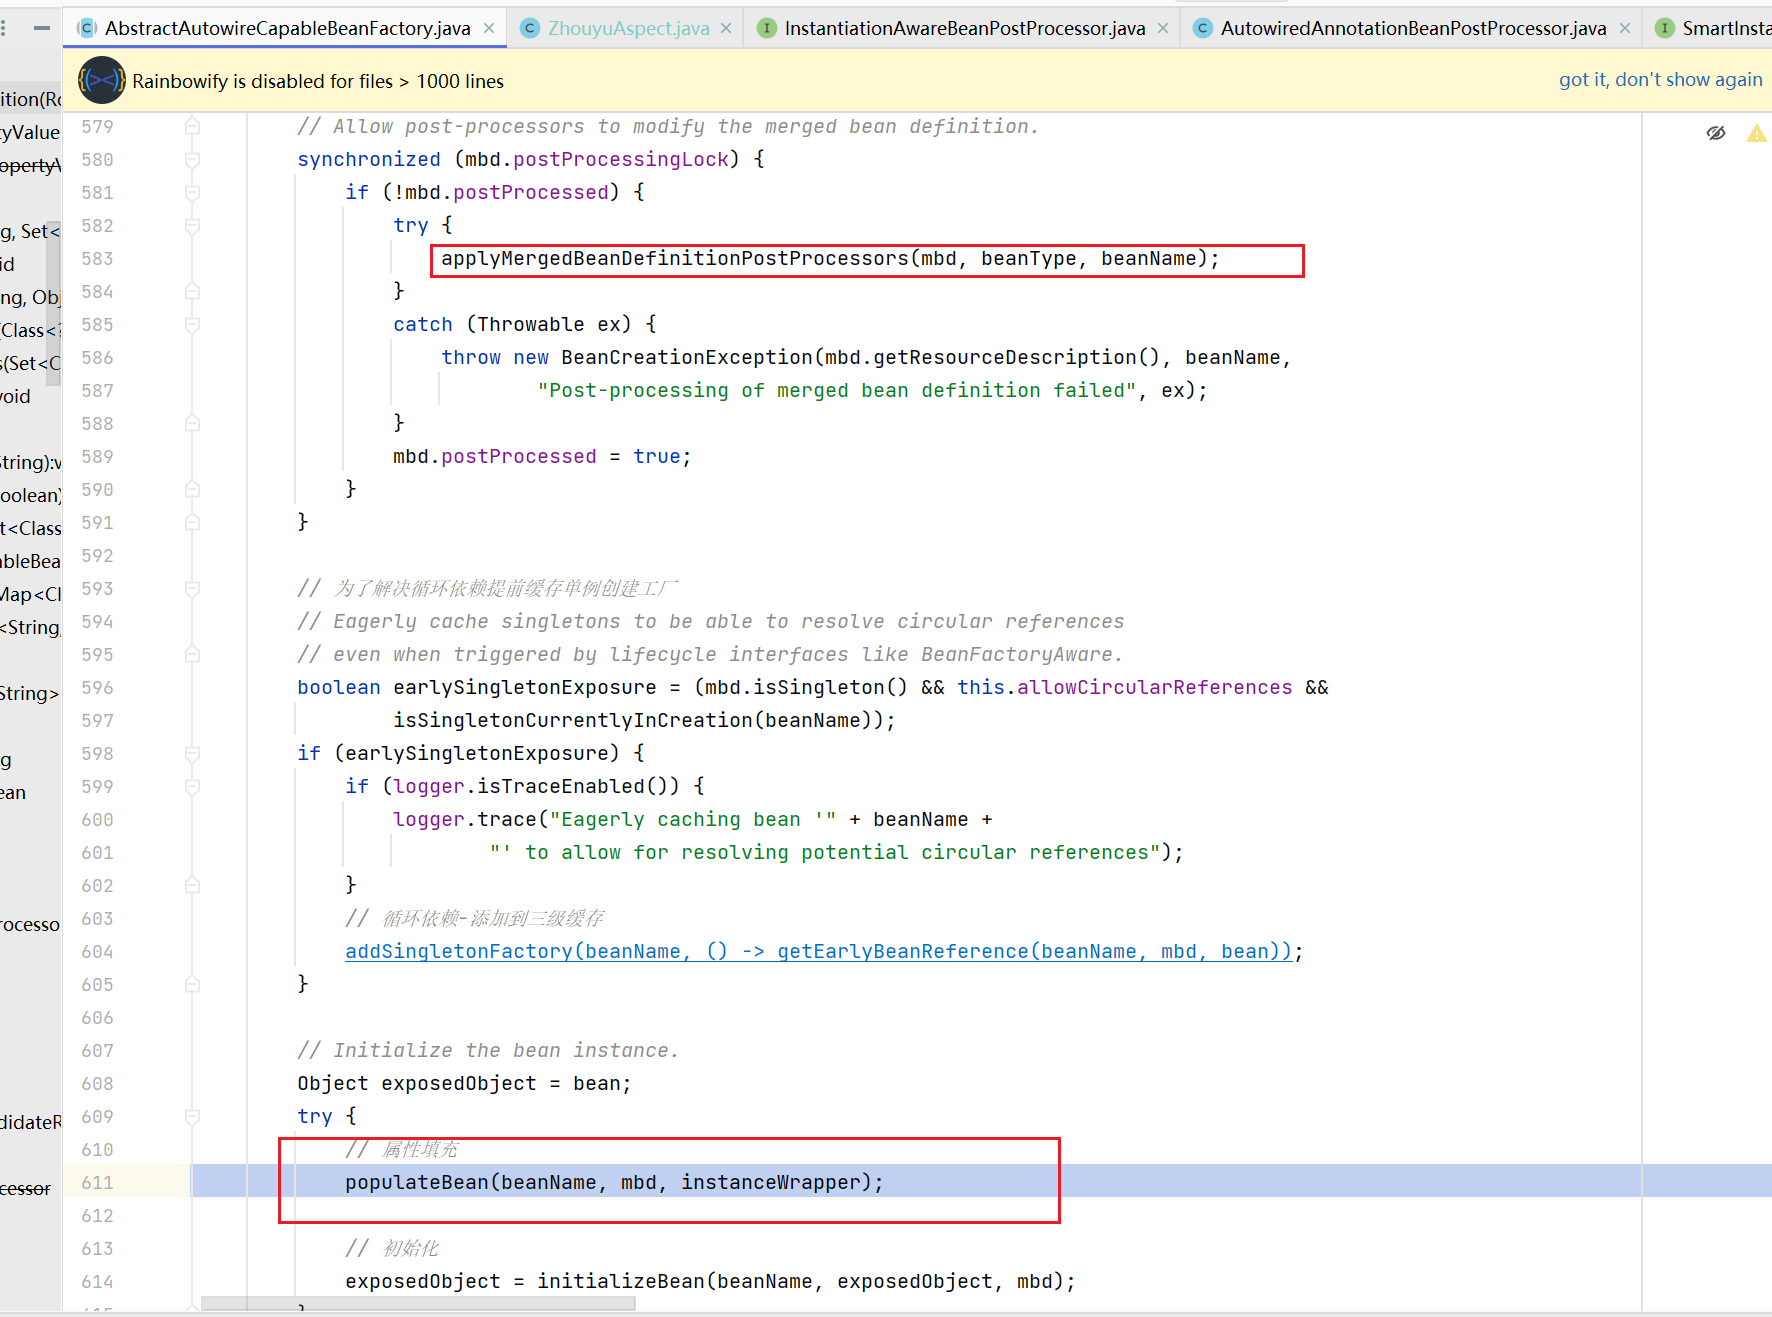
依赖注入,也就是bean在实例化之后,属性赋值时的处理
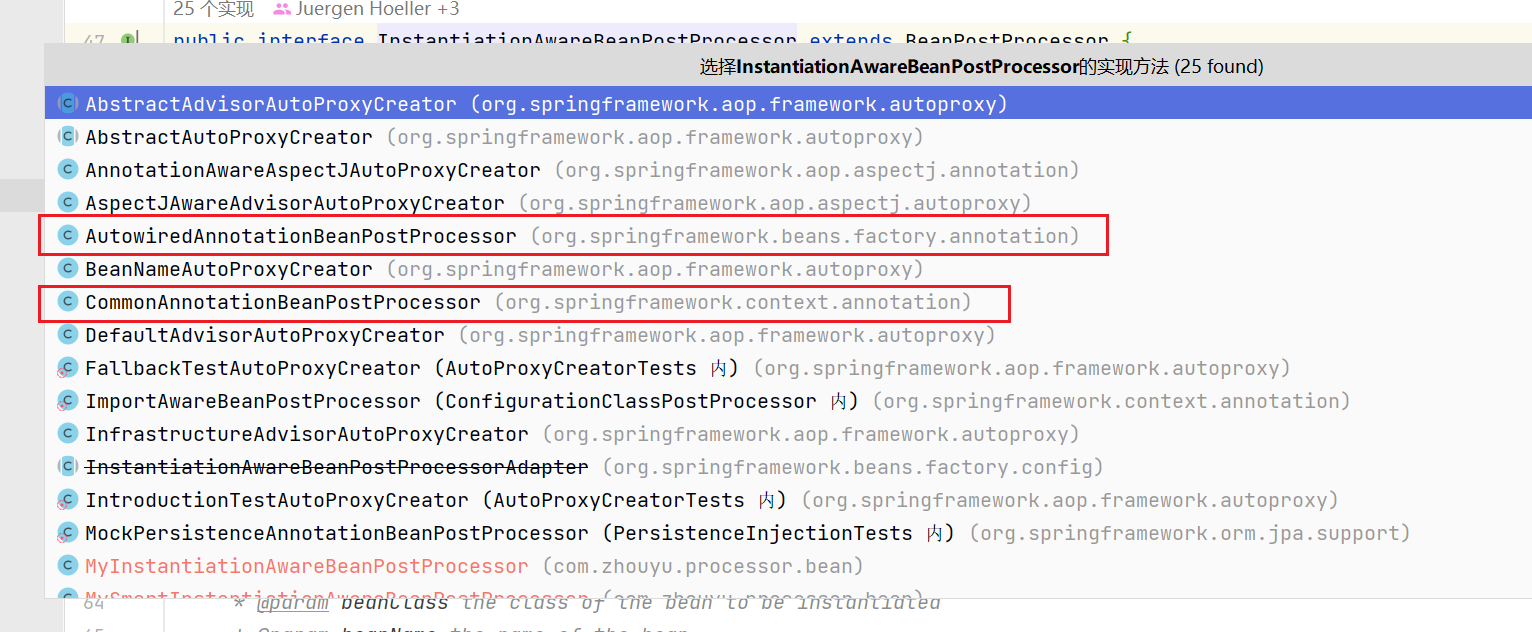
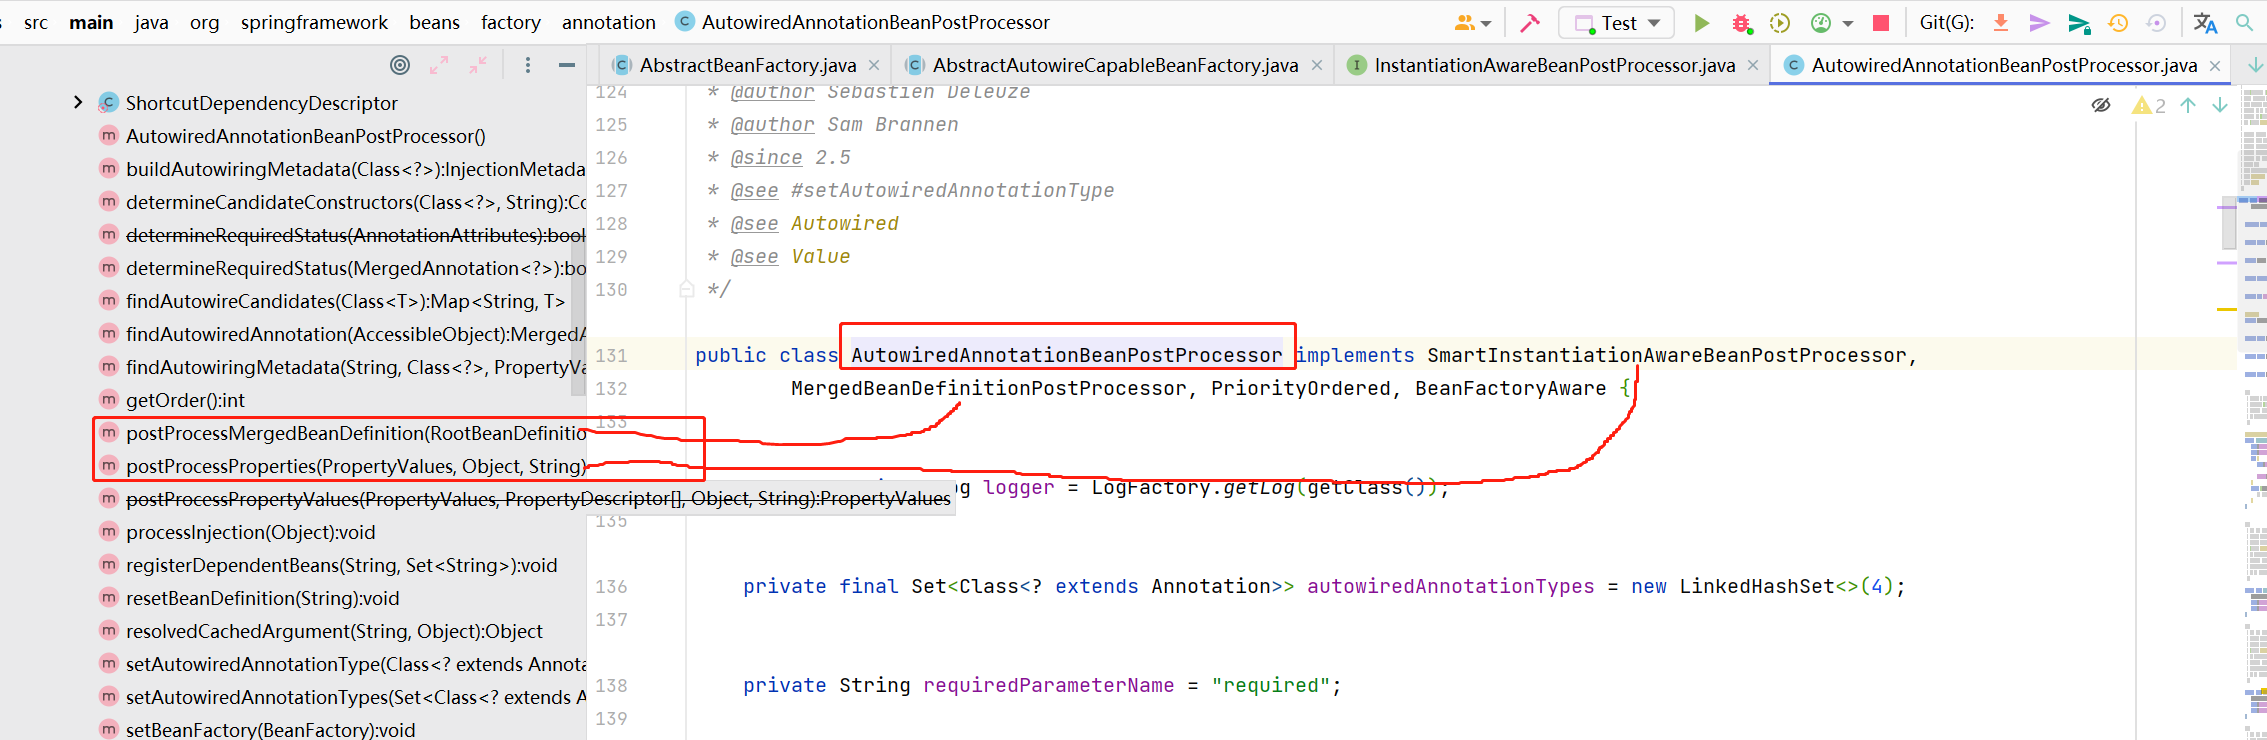
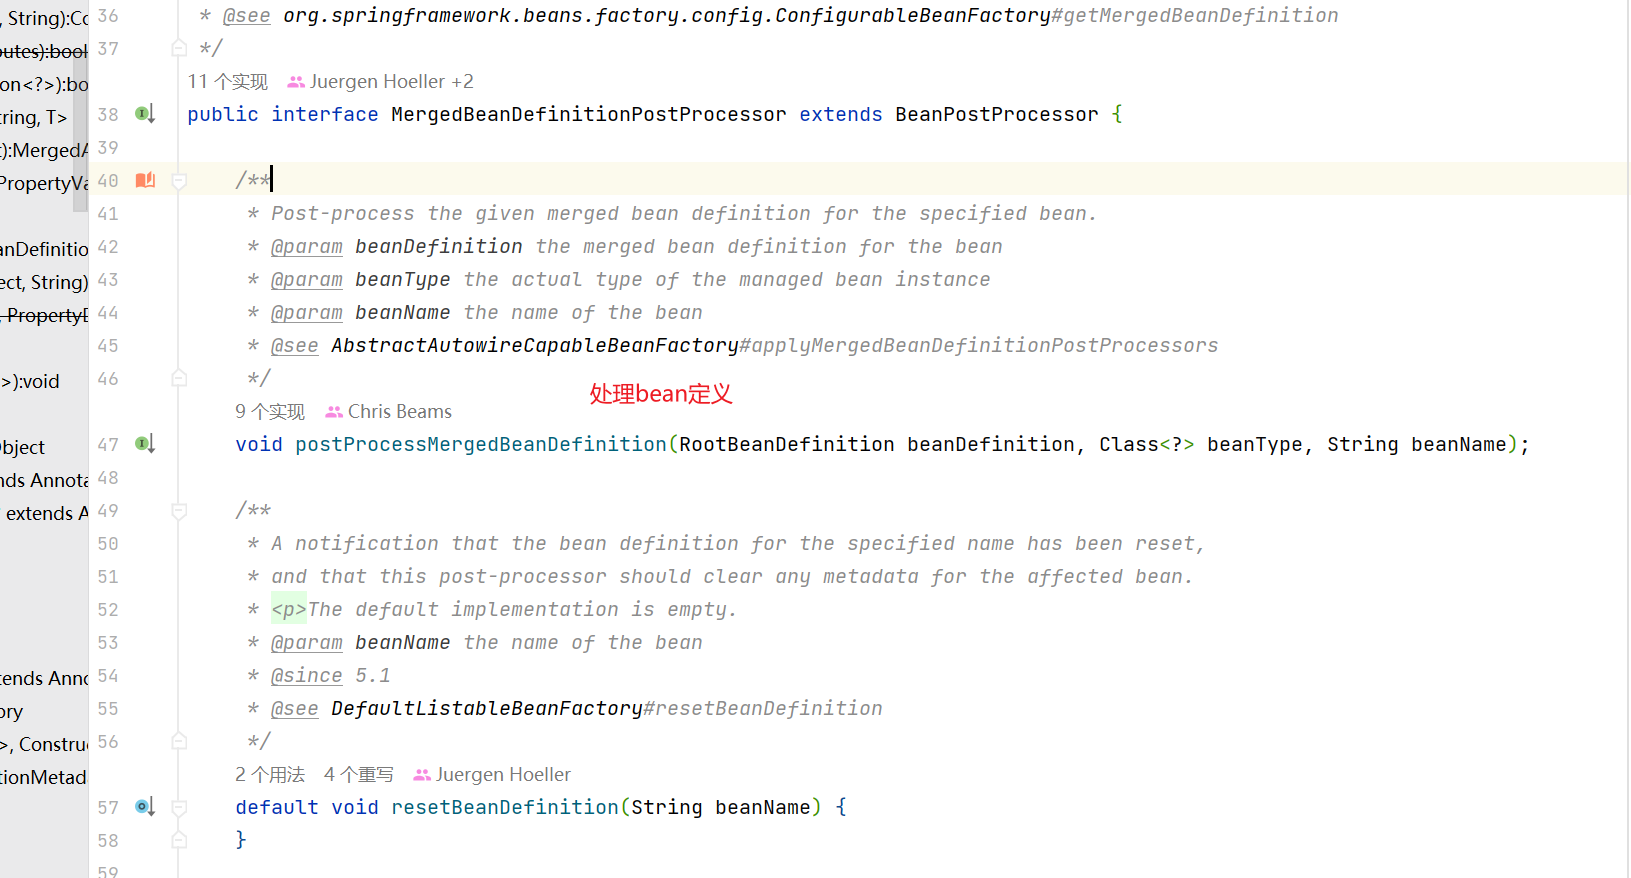
@autowired注解,是由AutowiredAnnotationBeanPostProcessor这个类处理的,它实现了smart实例化后置处理接口和mergedBean定义后置处理,所以会有对应方法的实现,
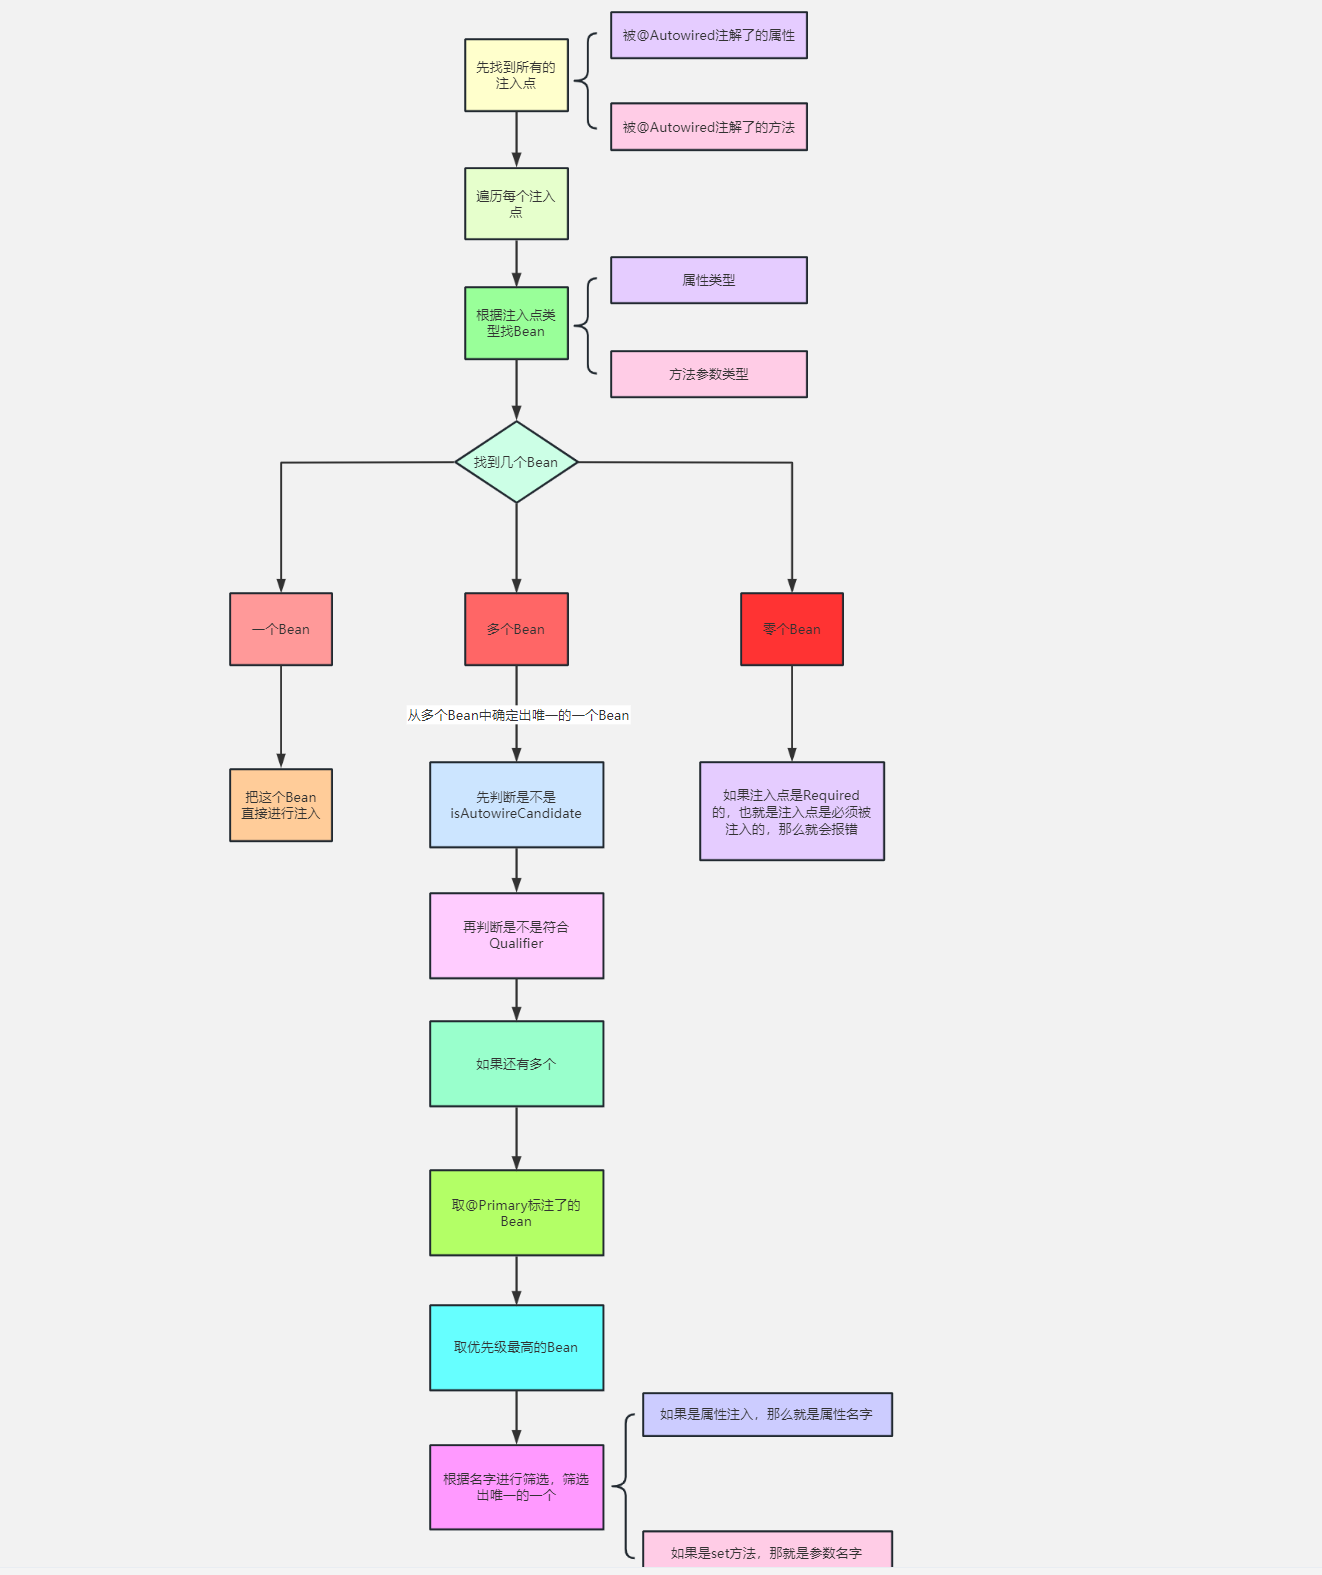
- 首先是找到注入点 :mergedBean定义后置处理 会在属性赋值之前执行方法postProcessMergedBeanDefinition,遍历当前类所有的属性字段,看有没有
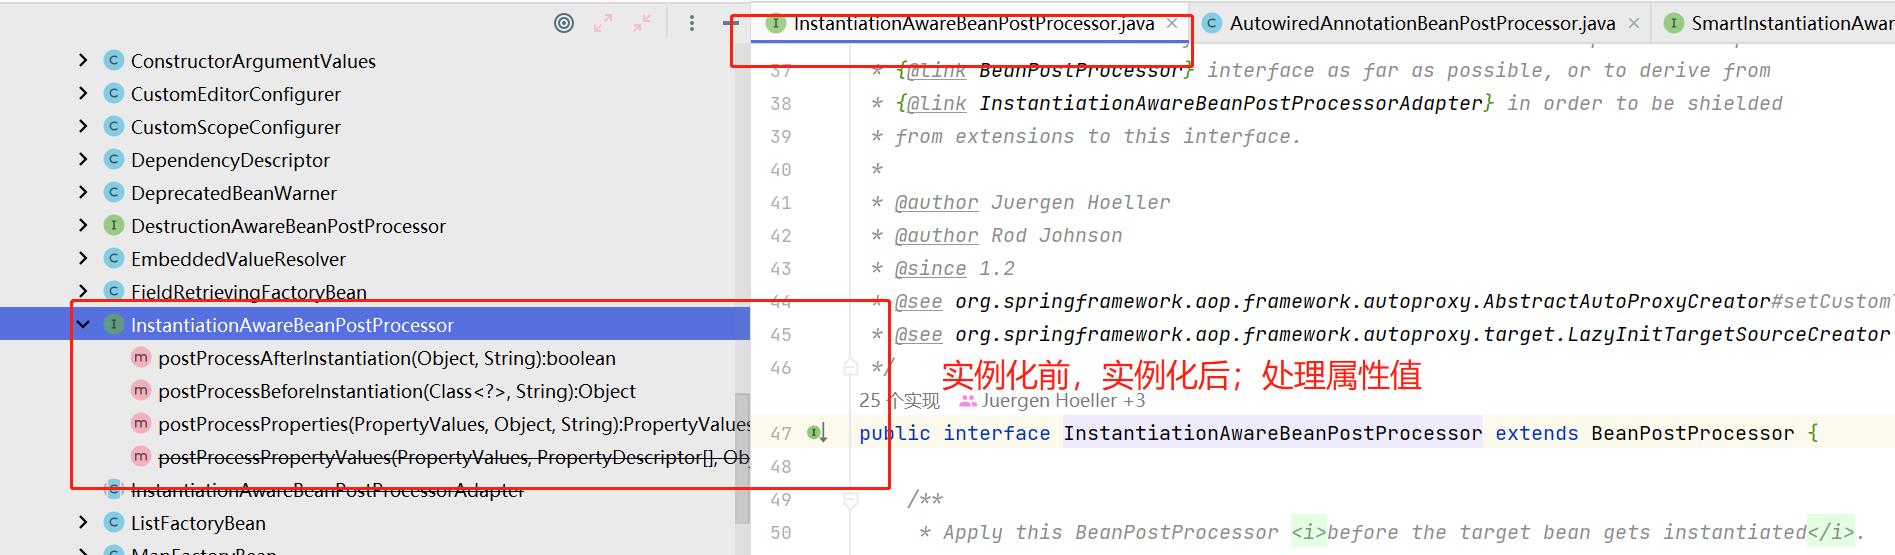
- [postProcessProperties](#kG1ZX)会先解析@value,紧接着是map,list这些类型的处理;接下来最常见的还是普通类型的:会有6个判断或者选择:根据类型寻找
- @Bean(autowireCandidate = true)这个属性,能不能被注入,
- 是不是泛型
- @Qualifier,如果还是找到了多个,那么会进行下面的
- 注意找到的可能是map<String,Object>中value可能是class然后调用getBean,也可能是bean对象,最后就可以利用反射进行赋值了
至于@resource则是处理的,看最下面流程图就可以。
上个图:
首先看下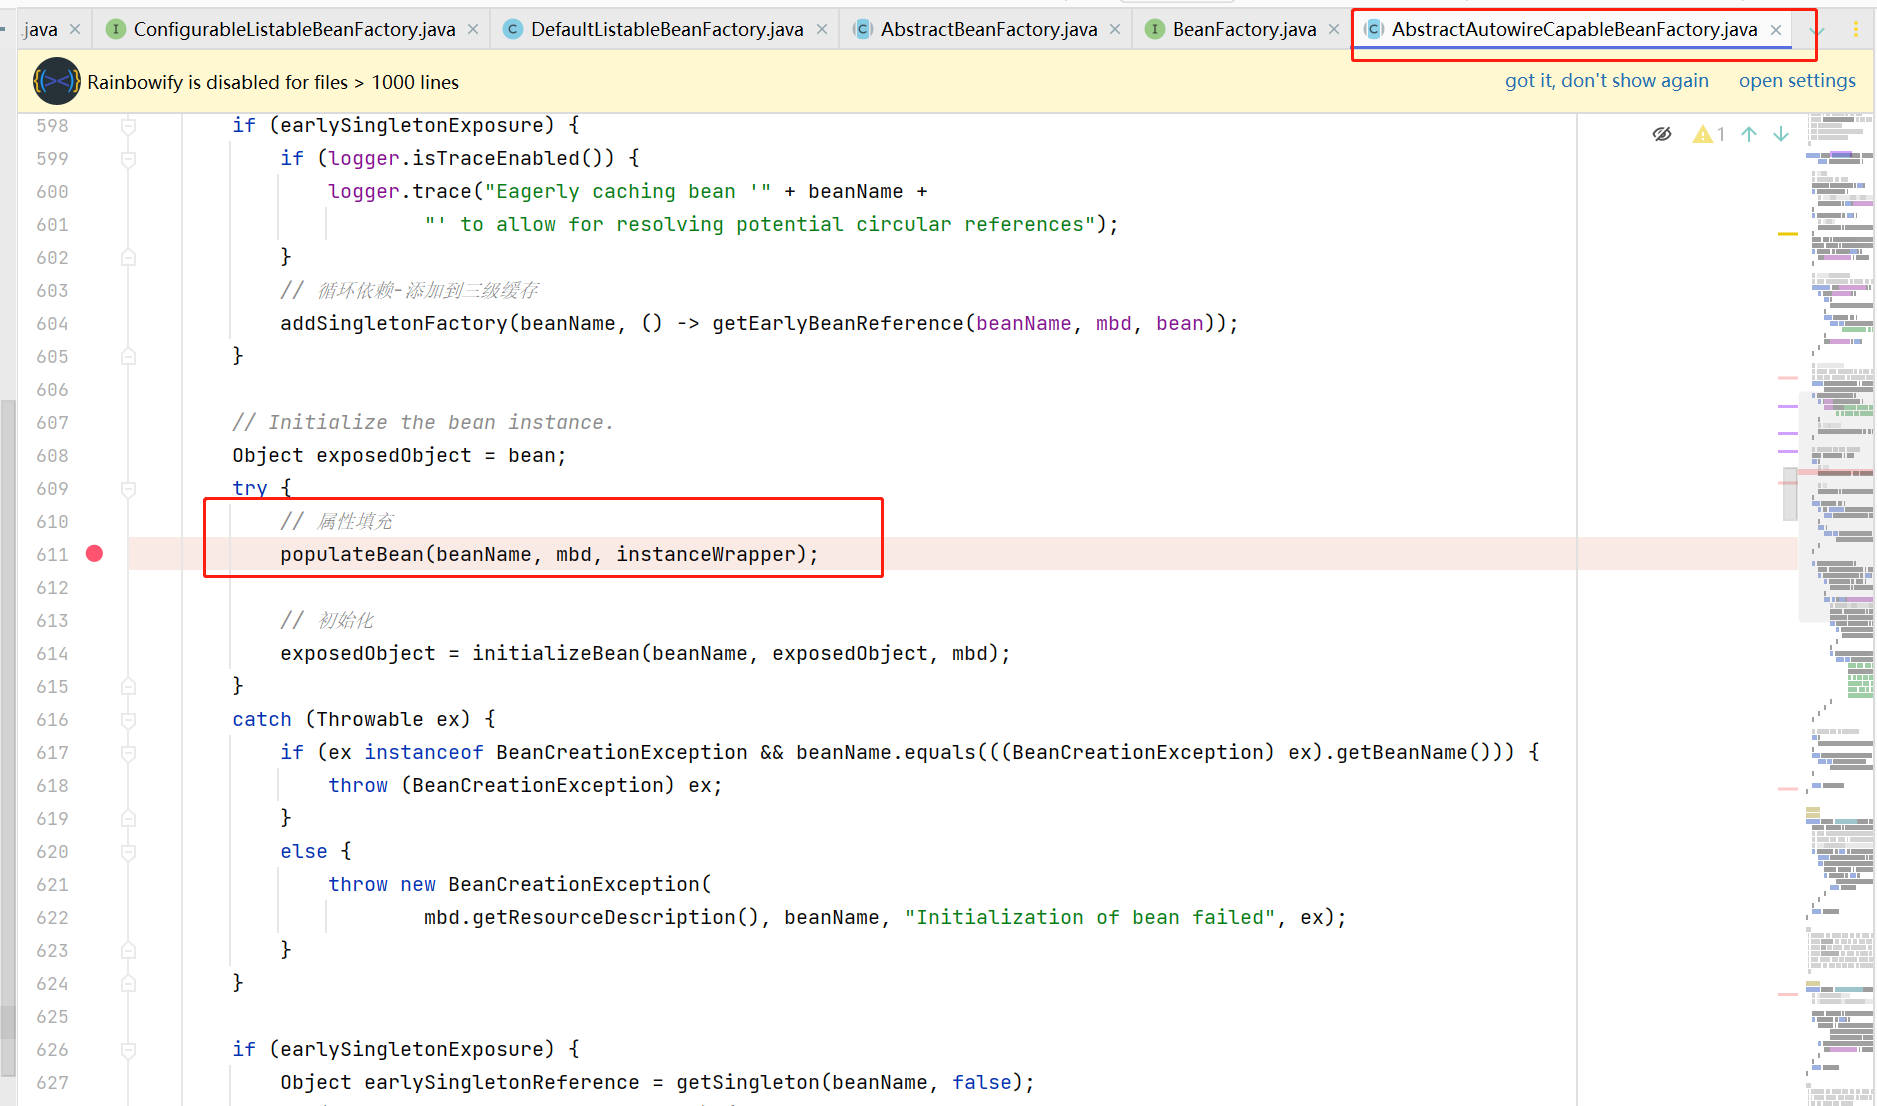
populateBean
protected void populateBean(String beanName, RootBeanDefinition mbd, @Nullable BeanWrapper bw) {
if (bw == null) {
if (mbd.hasPropertyValues()) {
throw new BeanCreationException(
mbd.getResourceDescription(), beanName, "Cannot apply property values to null instance");
}
else {
// Skip property population phase for null instance.
return;
}
}
// Give any InstantiationAwareBeanPostProcessors the opportunity to modify the
// state of the bean before properties are set. This can be used, for example,
// to support styles of field injection.
// 实例化之后,属性设置之前
if (!mbd.isSynthetic() && hasInstantiationAwareBeanPostProcessors()) {
for (InstantiationAwareBeanPostProcessor bp : getBeanPostProcessorCache().instantiationAware) {
if (!bp.postProcessAfterInstantiation(bw.getWrappedInstance(), beanName)) {
return;
}
}
}
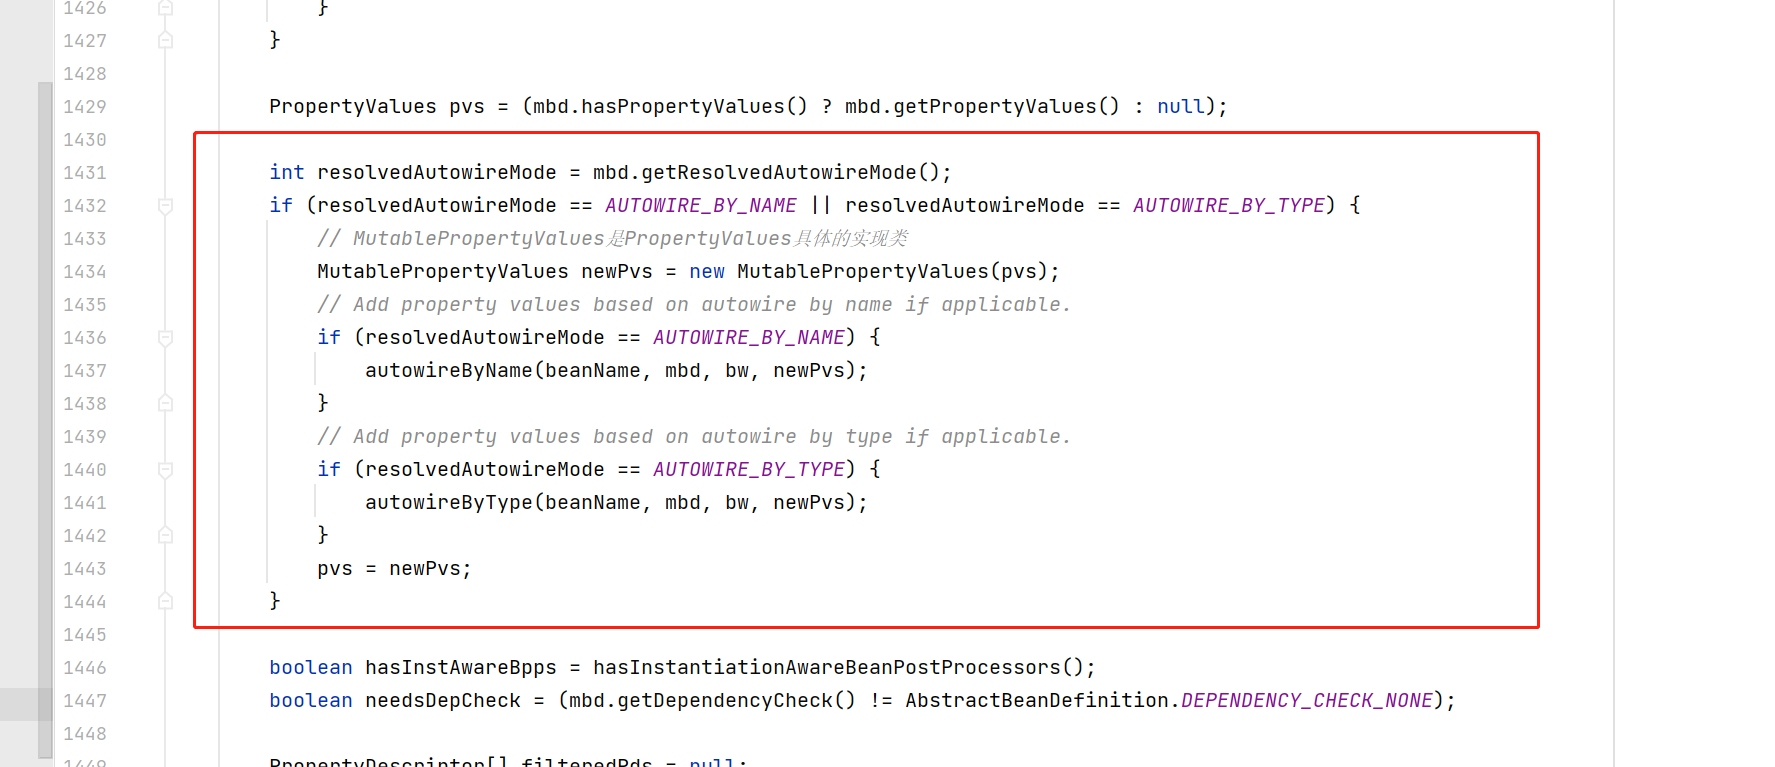
PropertyValues pvs = (mbd.hasPropertyValues() ? mbd.getPropertyValues() : null);
int resolvedAutowireMode = mbd.getResolvedAutowireMode();
if (resolvedAutowireMode == AUTOWIRE_BY_NAME || resolvedAutowireMode == AUTOWIRE_BY_TYPE) {
// MutablePropertyValues是PropertyValues具体的实现类
MutablePropertyValues newPvs = new MutablePropertyValues(pvs);
// Add property values based on autowire by name if applicable.
if (resolvedAutowireMode == AUTOWIRE_BY_NAME) {
autowireByName(beanName, mbd, bw, newPvs);
}
// Add property values based on autowire by type if applicable.
if (resolvedAutowireMode == AUTOWIRE_BY_TYPE) {
autowireByType(beanName, mbd, bw, newPvs);
}
pvs = newPvs;
}
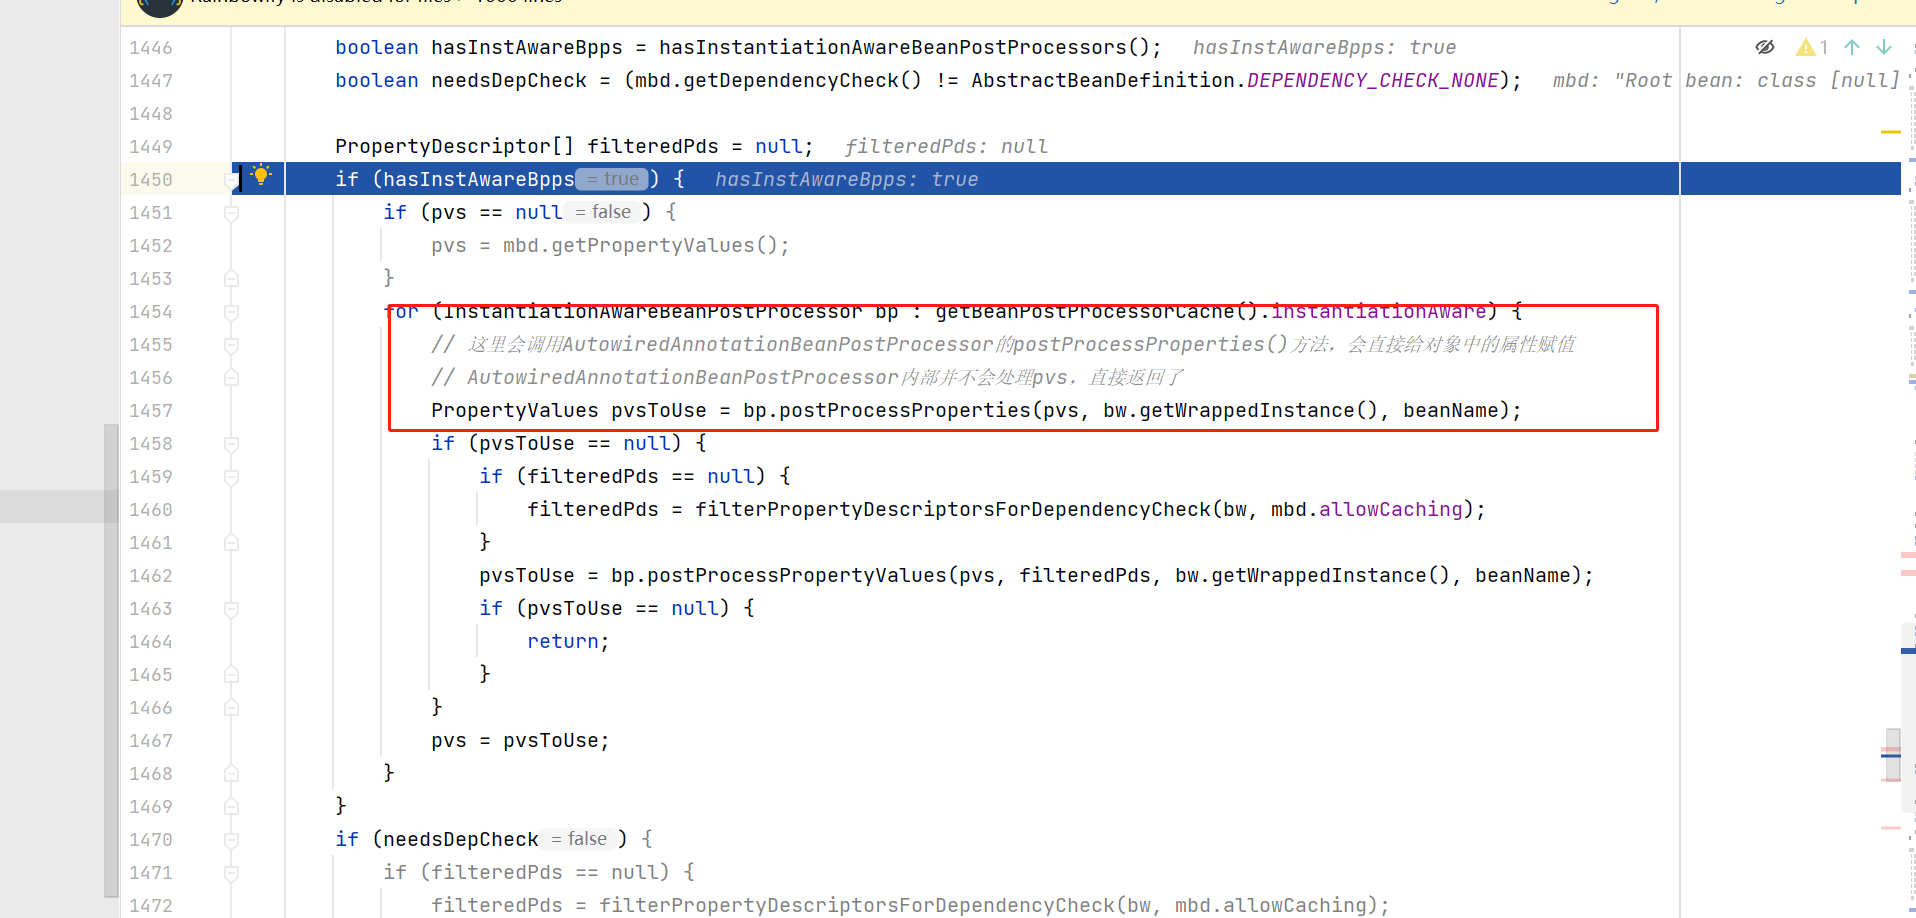
boolean hasInstAwareBpps = hasInstantiationAwareBeanPostProcessors();
boolean needsDepCheck = (mbd.getDependencyCheck() != AbstractBeanDefinition.DEPENDENCY_CHECK_NONE);
PropertyDescriptor[] filteredPds = null;
if (hasInstAwareBpps) {
if (pvs == null) {
pvs = mbd.getPropertyValues();
}
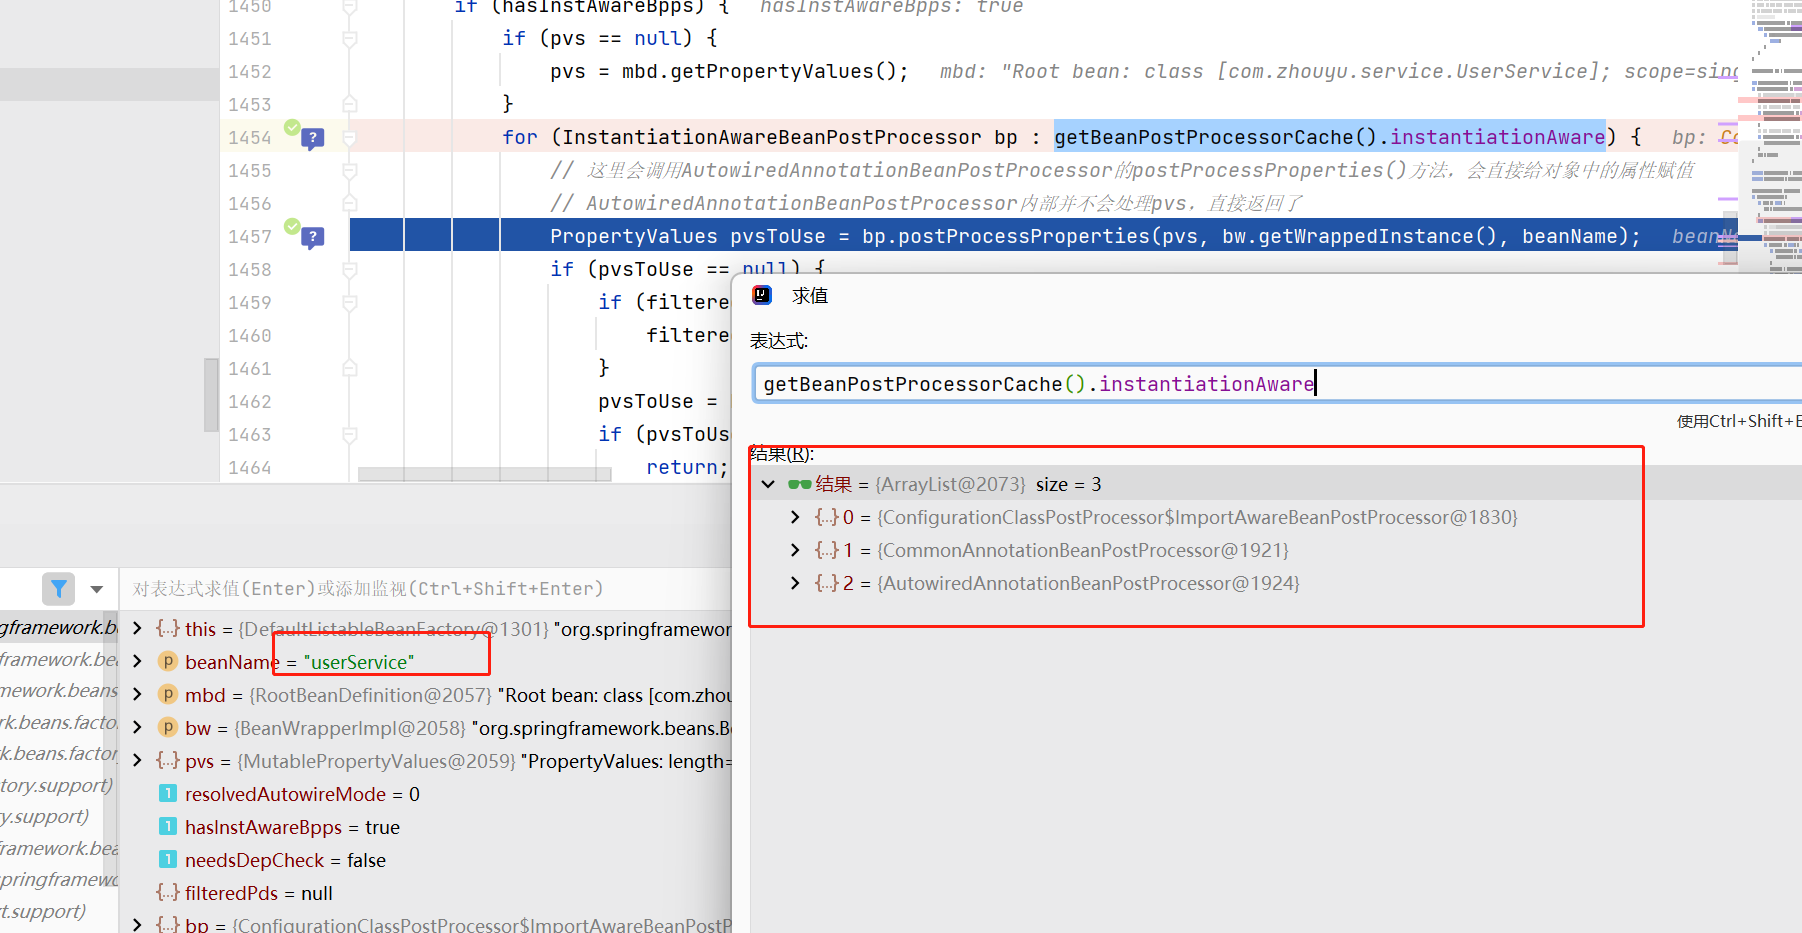
for (InstantiationAwareBeanPostProcessor bp : getBeanPostProcessorCache().instantiationAware) {
// 这里会调用AutowiredAnnotationBeanPostProcessor的postProcessProperties()方法,会直接给对象中的属性赋值
// AutowiredAnnotationBeanPostProcessor内部并不会处理pvs,直接返回了
PropertyValues pvsToUse = bp.postProcessProperties(pvs, bw.getWrappedInstance(), beanName);
if (pvsToUse == null) {
if (filteredPds == null) {
filteredPds = filterPropertyDescriptorsForDependencyCheck(bw, mbd.allowCaching);
}
pvsToUse = bp.postProcessPropertyValues(pvs, filteredPds, bw.getWrappedInstance(), beanName);
if (pvsToUse == null) {
return;
}
}
pvs = pvsToUse;
}
}
if (needsDepCheck) {
if (filteredPds == null) {
filteredPds = filterPropertyDescriptorsForDependencyCheck(bw, mbd.allowCaching);
}
checkDependencies(beanName, mbd, filteredPds, pvs);
}
// 如果当前Bean中的BeanDefinition中设置了PropertyValues,那么最终将是PropertyValues中的值,覆盖@Autowired
if (pvs != null) {
applyPropertyValues(beanName, mbd, bw, pvs);
}
}__虽然已经过时了:
autowireByName
	protected void autowireByName(
			String beanName, AbstractBeanDefinition mbd, BeanWrapper bw, MutablePropertyValues pvs) {

		// 当前Bean中能进行自动注入的属性名
		String[] propertyNames = unsatisfiedNonSimpleProperties(mbd, bw);
		// 遍历每个属性名,并去获取Bean对象,并设置到pvs中
		for (String propertyName : propertyNames) {
			if (containsBean(propertyName)) {
				Object bean = getBean(propertyName);
				pvs.add(propertyName, bean);
				// 记录一下propertyName对应的Bean被beanName给依赖了
				registerDependentBean(propertyName, beanName);
				if (logger.isTraceEnabled()) {
					logger.trace("Added autowiring by name from bean name '" + beanName +
							"' via property '" + propertyName + "' to bean named '" + propertyName + "'");
				}
			}
			else {
				if (logger.isTraceEnabled()) {
					logger.trace("Not autowiring property '" + propertyName + "' of bean '" + beanName +
							"' by name: no matching bean found");
				}
			}
		}
	}
unsatisfiedNonSimpleProperties
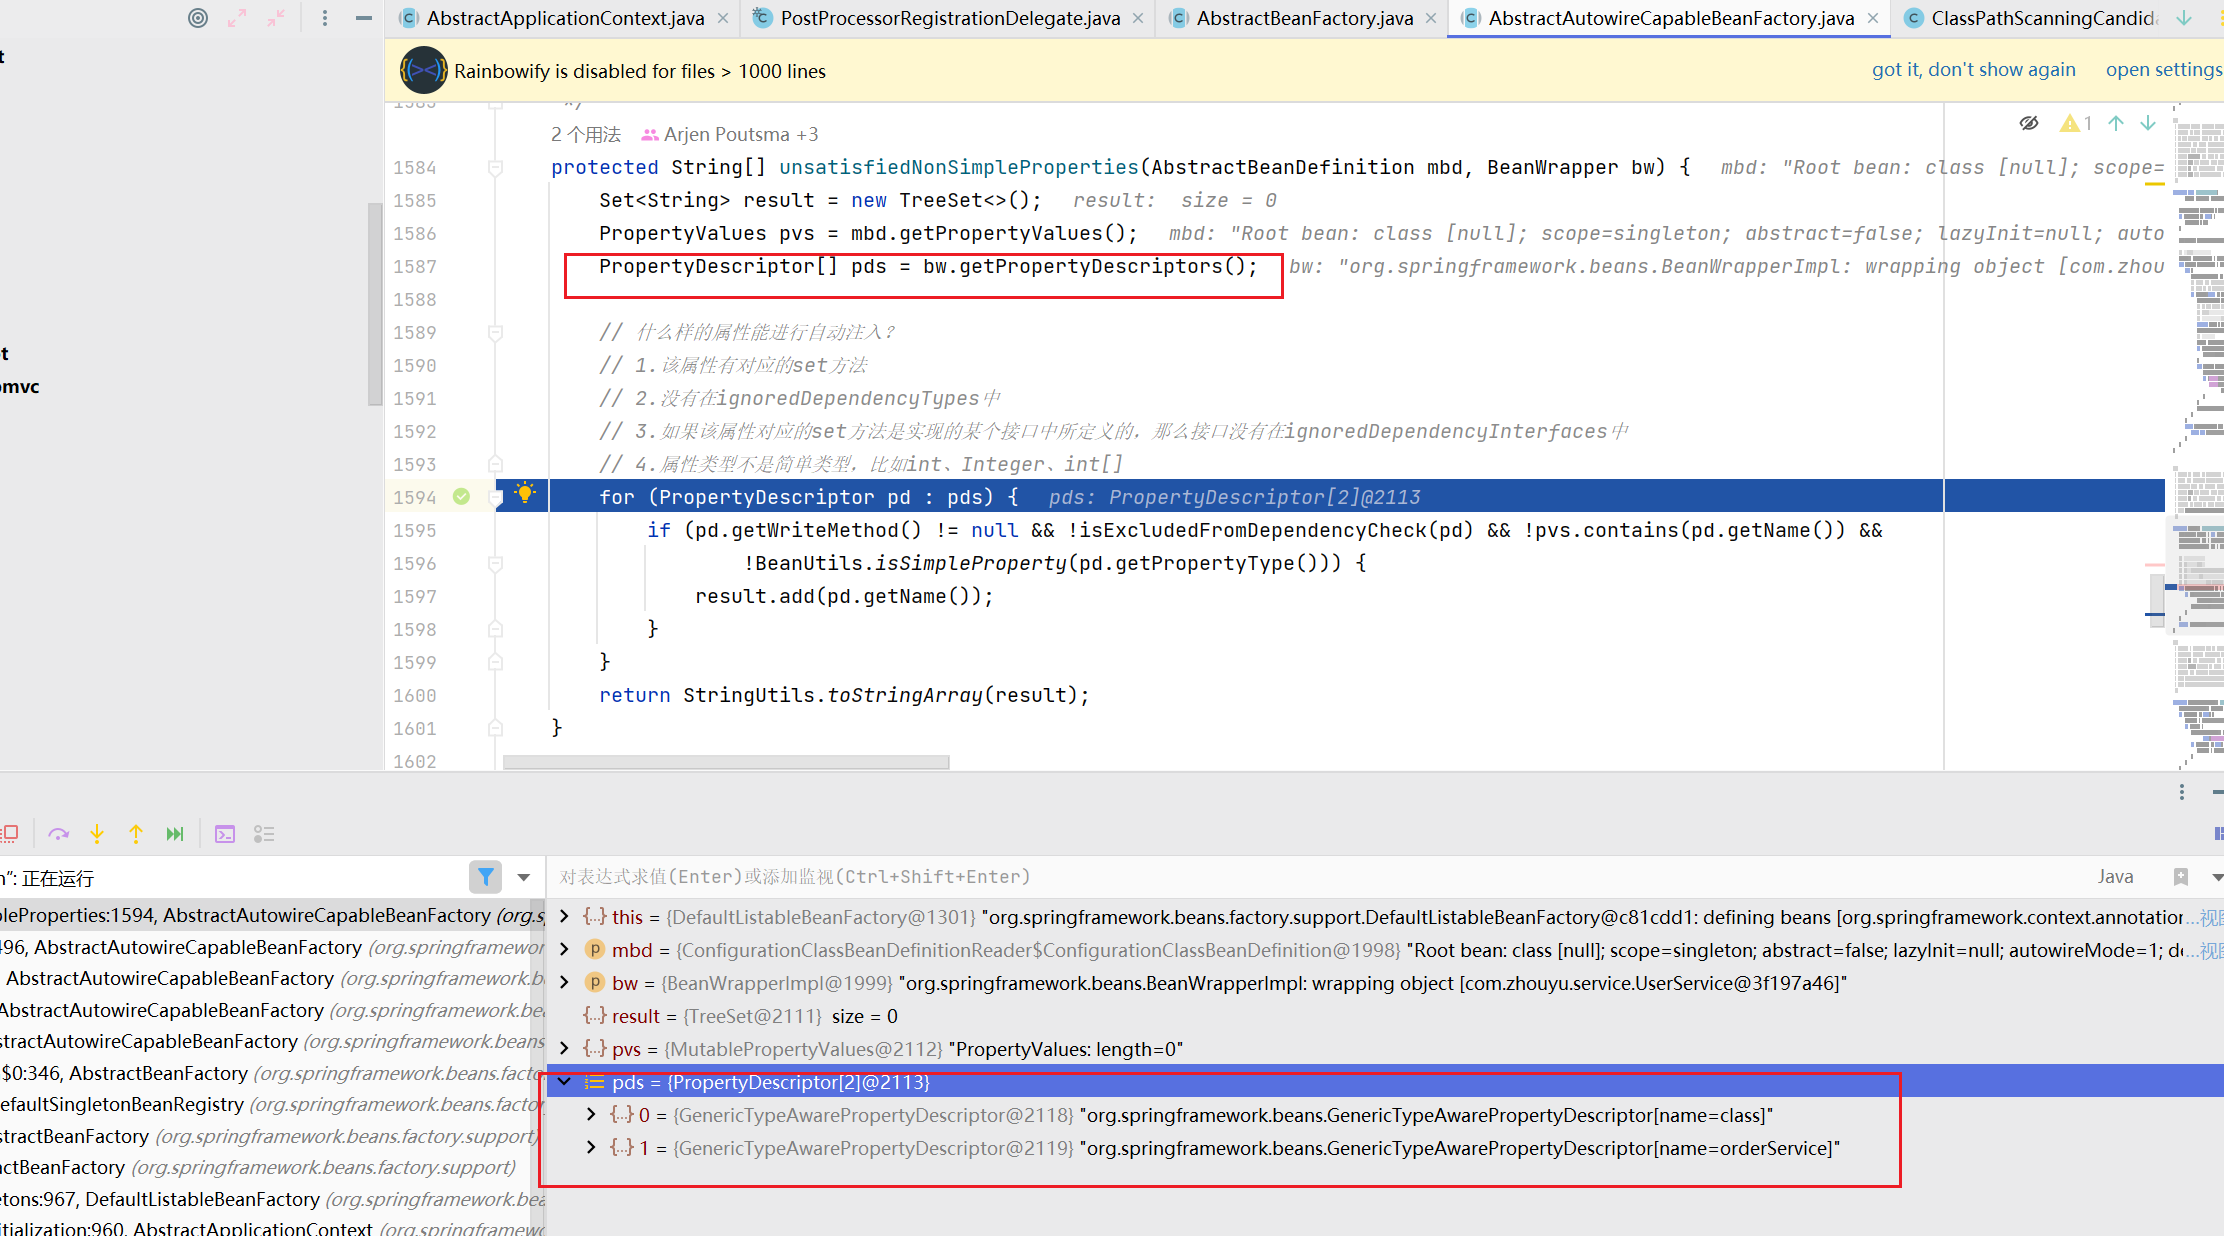
protected String[] unsatisfiedNonSimpleProperties(AbstractBeanDefinition mbd, BeanWrapper bw) {
Set<String> result = new TreeSet<>();
PropertyValues pvs = mbd.getPropertyValues();
PropertyDescriptor[] pds = bw.getPropertyDescriptors();
// 什么样的属性能进行自动注入?
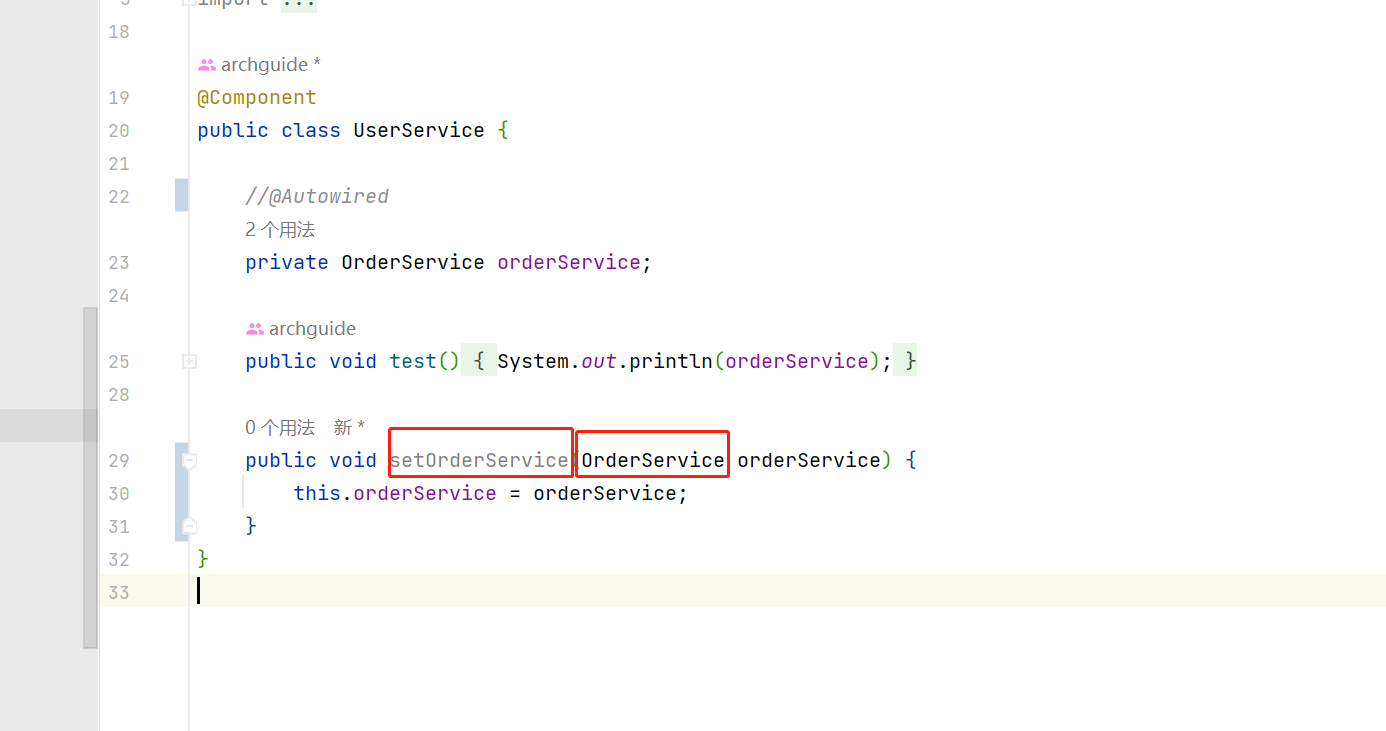
// 1.该属性有对应的set方法
// 2.没有在ignoredDependencyTypes中
// 3.如果该属性对应的set方法是实现的某个接口中所定义的,那么接口没有在ignoredDependencyInterfaces中
// 4.属性类型不是简单类型,比如int、Integer、int[]
for (PropertyDescriptor pd : pds) {
if (pd.getWriteMethod() != null && !isExcludedFromDependencyCheck(pd) && !pvs.contains(pd.getName()) &&
!BeanUtils.isSimpleProperty(pd.getPropertyType())) {
result.add(pd.getName());
}
}
return StringUtils.toStringArray(result);
}最后在属性赋值populateBean方法的最后赋值

autowireByType
跟上面相似,寻找set方法的参数的类型,按照类型寻找bean
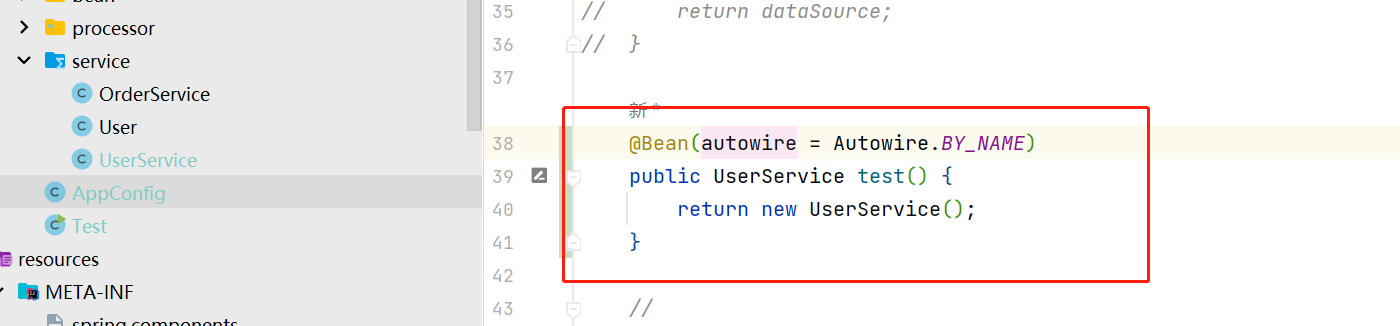
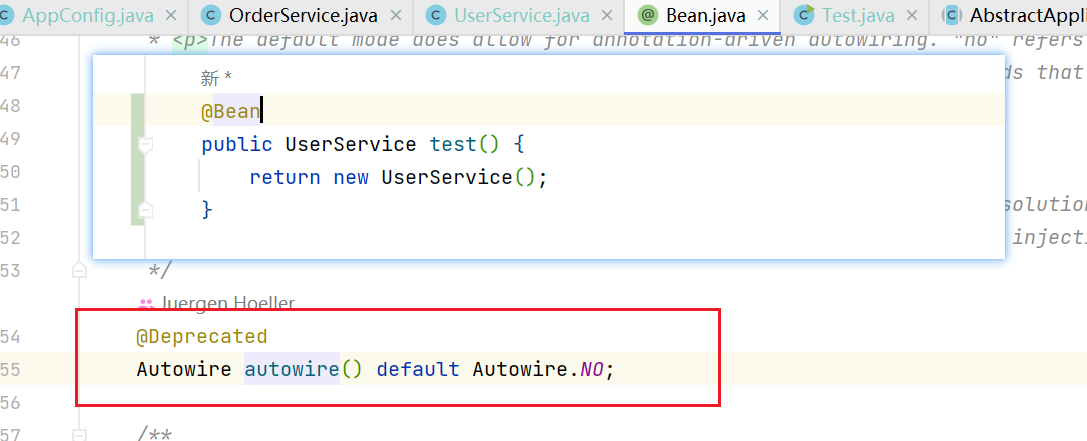
默认什么都不加,就不会进到这两段的处理逻辑:
@Autowired
- ********
- ********
- ********
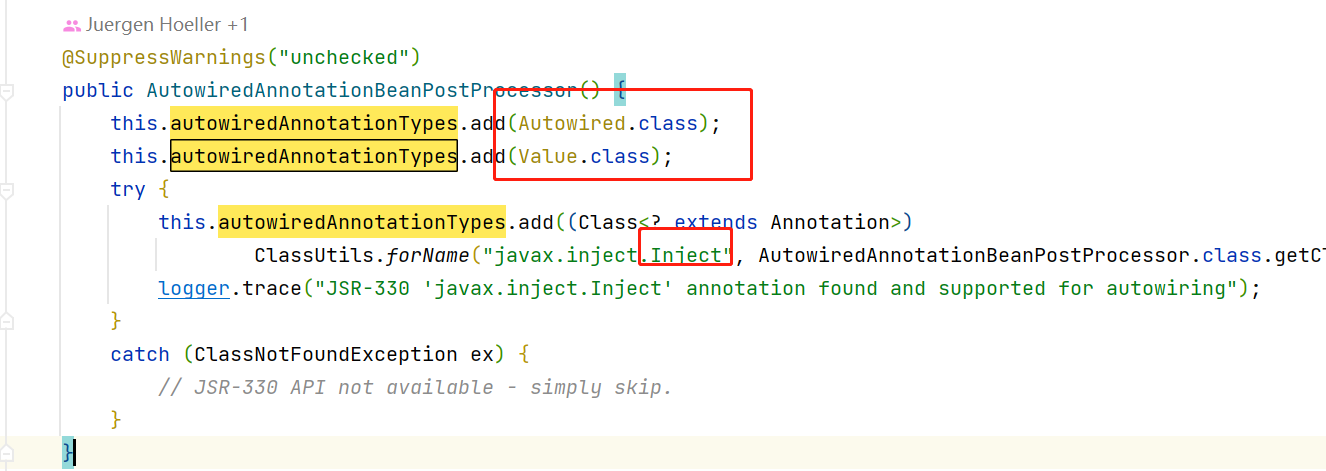
这一段就是处理@Autowired,@value,@resouce,注解

复习一下之前第一篇的生命周期处理器
其中的执行流程:
- ********
- ****
- ********
- ****
findAutowiringMetadata
一开始肯定是没有缓存的,所以进入到metadata = buildAutowiringMetadata(clazz);
private InjectionMetadata findAutowiringMetadata(String beanName, Class<?> clazz, @Nullable PropertyValues pvs) {
// Fall back to class name as cache key, for backwards compatibility with custom callers.
String cacheKey = (StringUtils.hasLength(beanName) ? beanName : clazz.getName());
// Quick check on the concurrent map first, with minimal locking.
InjectionMetadata metadata = this.injectionMetadataCache.get(cacheKey);
if (InjectionMetadata.needsRefresh(metadata, clazz)) {
synchronized (this.injectionMetadataCache) {
metadata = this.injectionMetadataCache.get(cacheKey);
if (InjectionMetadata.needsRefresh(metadata, clazz)) {
if (metadata != null) {
metadata.clear(pvs);
}
// 解析注入点并缓存
metadata = buildAutowiringMetadata(clazz);
this.injectionMetadataCache.put(cacheKey, metadata);
}
}
}
return metadata;
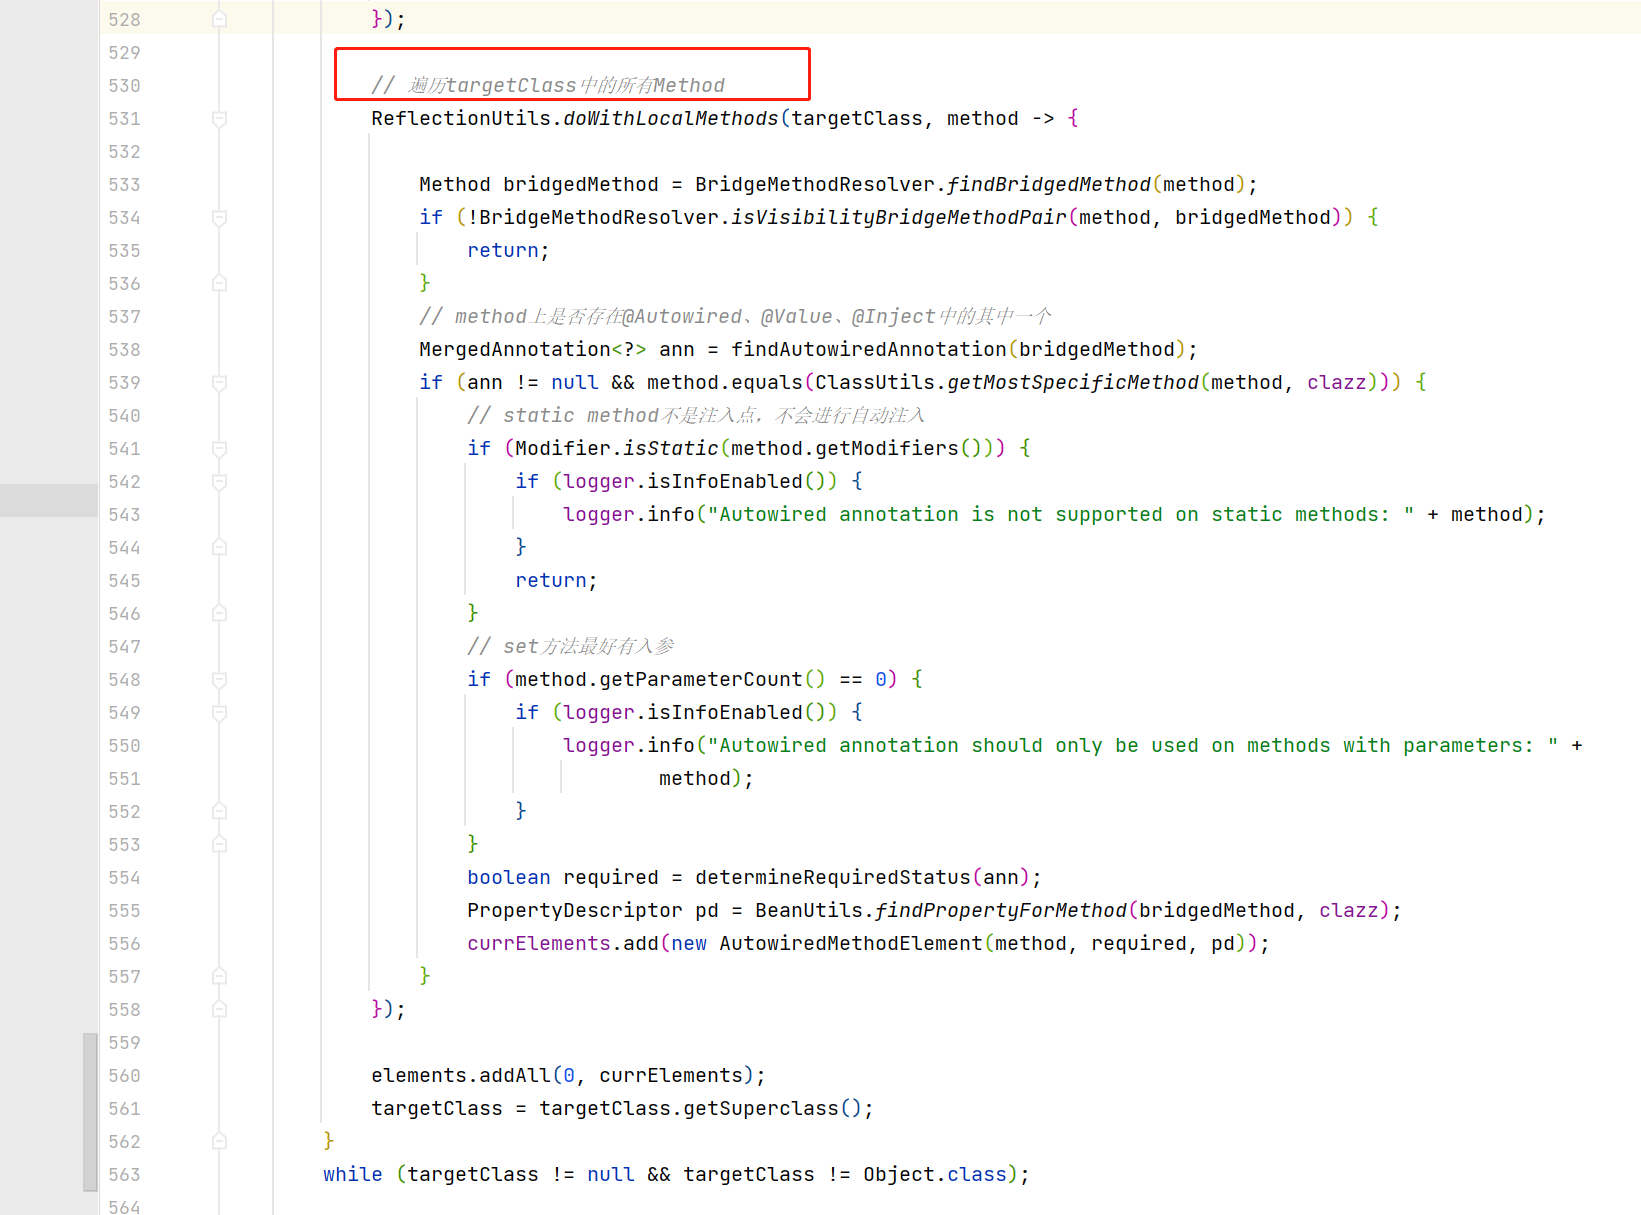
}// 解析注入点并缓存buildAutowiringMetadata
// 解析注入点并缓存
这个方法挺多的,源码分开来放

- 看这个字段上有没有这三个注解的某一个:
- 看注解上的这属性
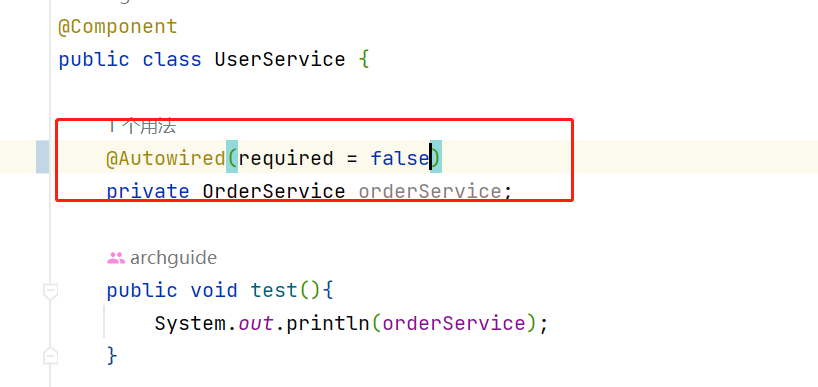
- 有的话,就把这个字段加入到
然后会用do while遍历父类
@Override
public PropertyValues postProcessProperties(PropertyValues pvs, Object bean, String beanName) {
  // 找注入点(所有被@Autowired注解了的Field或Method)
  InjectionMetadata metadata = findAutowiringMetadata(beanName, bean.getClass(), pvs);
  try {
    metadata.inject(bean, beanName, pvs);
  }
  catch (BeanCreationException ex) {
    throw ex;
  }
  catch (Throwable ex) {
    throw new BeanCreationException(beanName, "Injection of autowired dependencies failed", ex);
  }
  return pvs;
}
inject遍历每个注入点进行依赖注入
public void inject(Object target, @Nullable String beanName, @Nullable PropertyValues pvs) throws Throwable {
Collection<InjectedElement> checkedElements = this.checkedElements;
Collection<InjectedElement> elementsToIterate =
(checkedElements != null ? checkedElements : this.injectedElements);
if (!elementsToIterate.isEmpty()) {
// 遍历每个注入点进行依赖注入
for (InjectedElement element : elementsToIterate) {
element.inject(target, beanName, pvs);
}
}
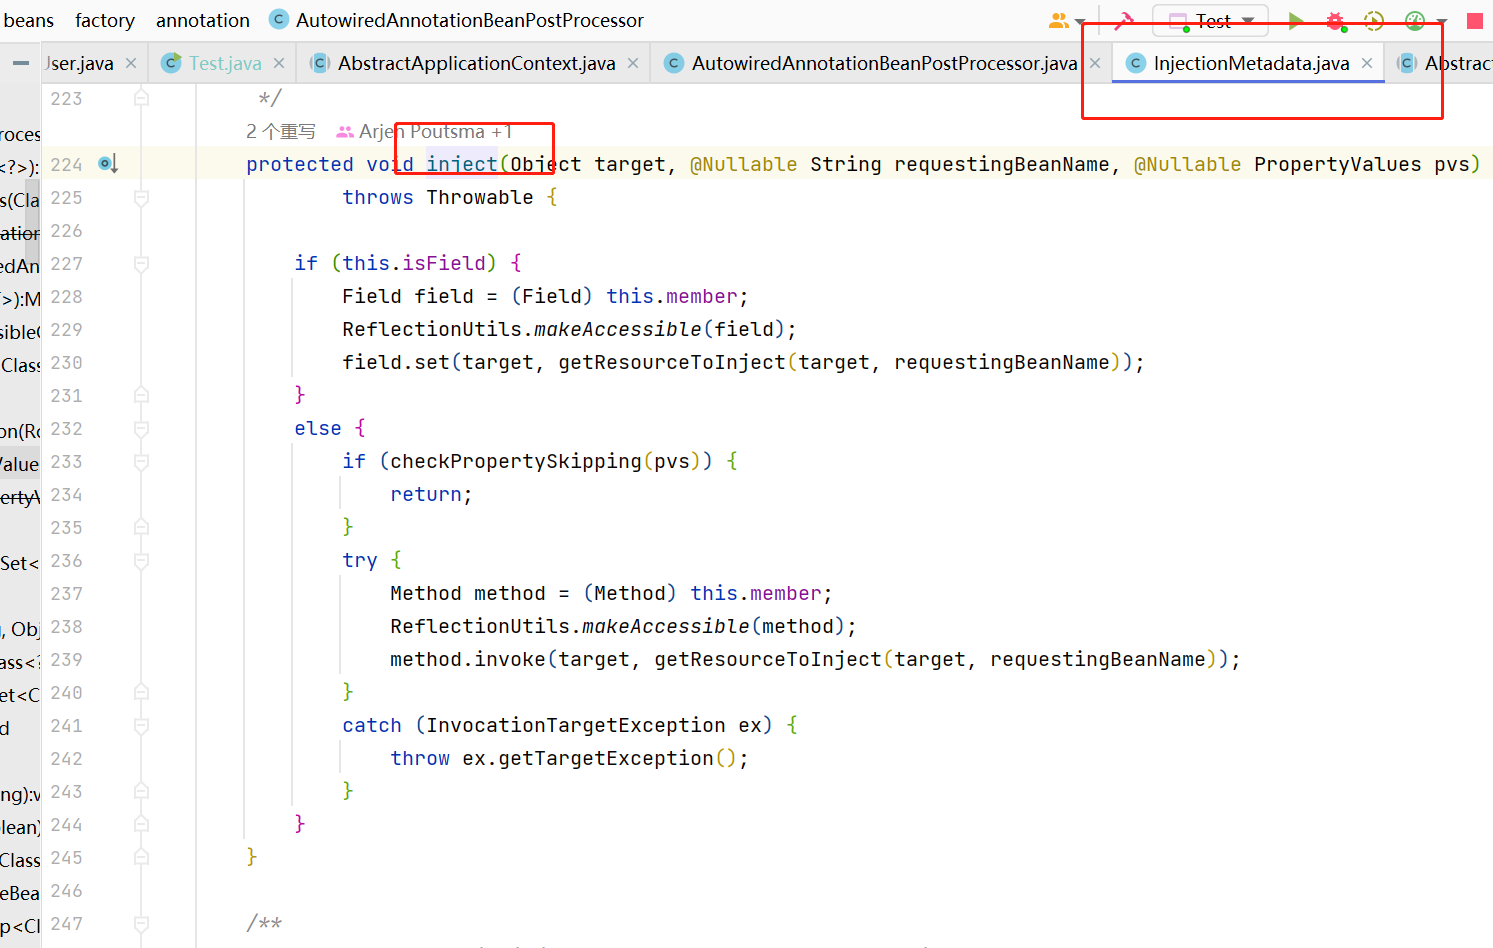
}注意这个方法是处理 @resource的
这个才是真正处理autowired字段和属性注入的类

- ****
- ****
- ****
- ************
inject
@Override
protected void inject(Object bean, @Nullable String beanName, @Nullable PropertyValues pvs) throws Throwable {

  Field field = (Field) this.member;
  Object value;
  if (this.cached) {
    // 对于原型Bean,第一次创建的时候,也找注入点,然后进行注入,此时cached为false,注入完了之后cached为true
    // 第二次创建的时候,先找注入点(此时会拿到缓存好的注入点),也就是AutowiredFieldElement对象,此时cache为true,也就进到此处了
    // 注入点内并没有缓存被注入的具体Bean对象,而是beanName,这样就能保证注入到不同的原型Bean对象
    try {
      value = resolvedCachedArgument(beanName, this.cachedFieldValue);
    }
    catch (NoSuchBeanDefinitionException ex) {
      // Unexpected removal of target bean for cached argument -> re-resolve
      value = resolveFieldValue(field, bean, beanName);
    }
  }
  else {
    // 根据filed从BeanFactory中查到的匹配的Bean对象
    value = resolveFieldValue(field, bean, beanName);
  }

  // 反射给filed赋值
  if (value != null) {
    ReflectionUtils.makeAccessible(field);
    field.set(bean, value);
  }
}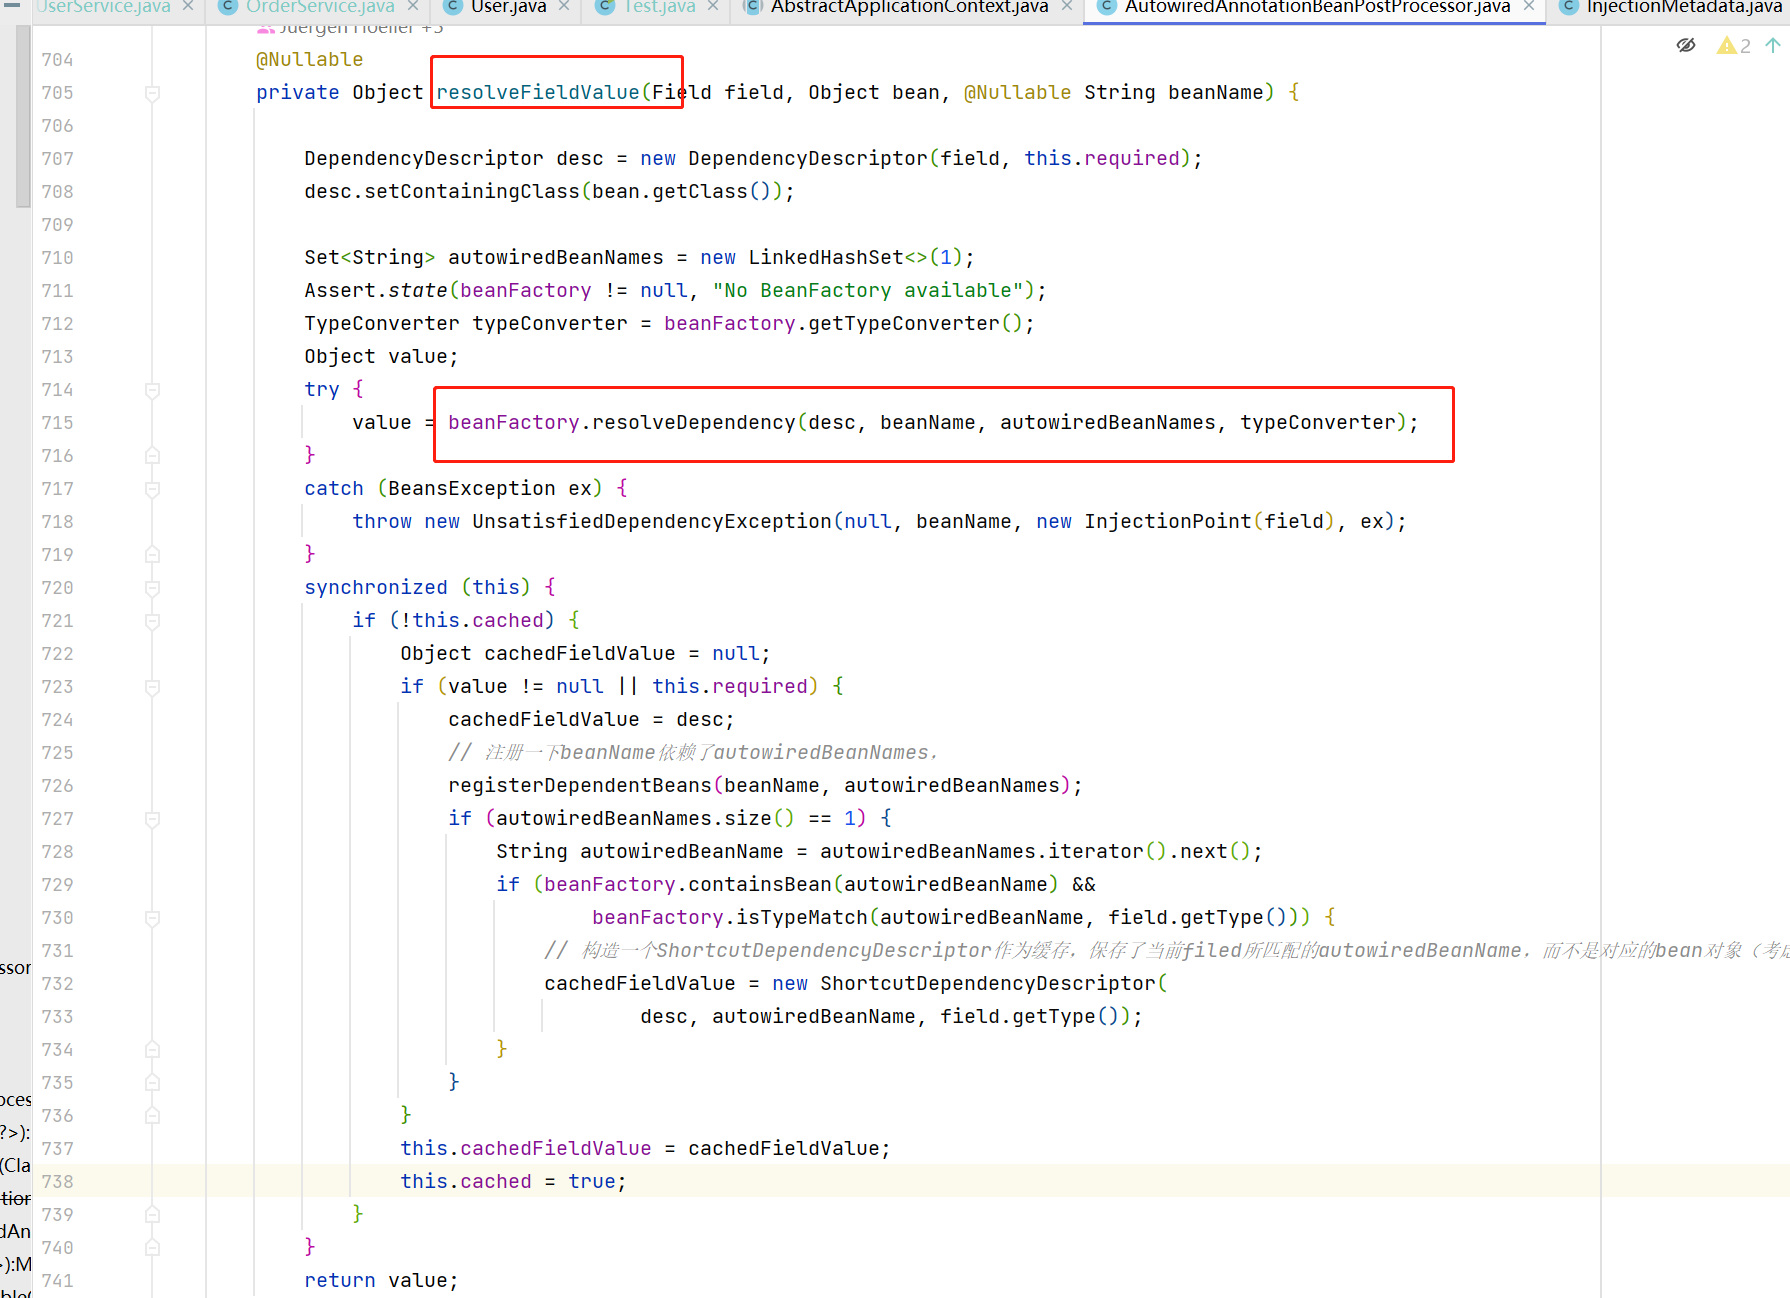
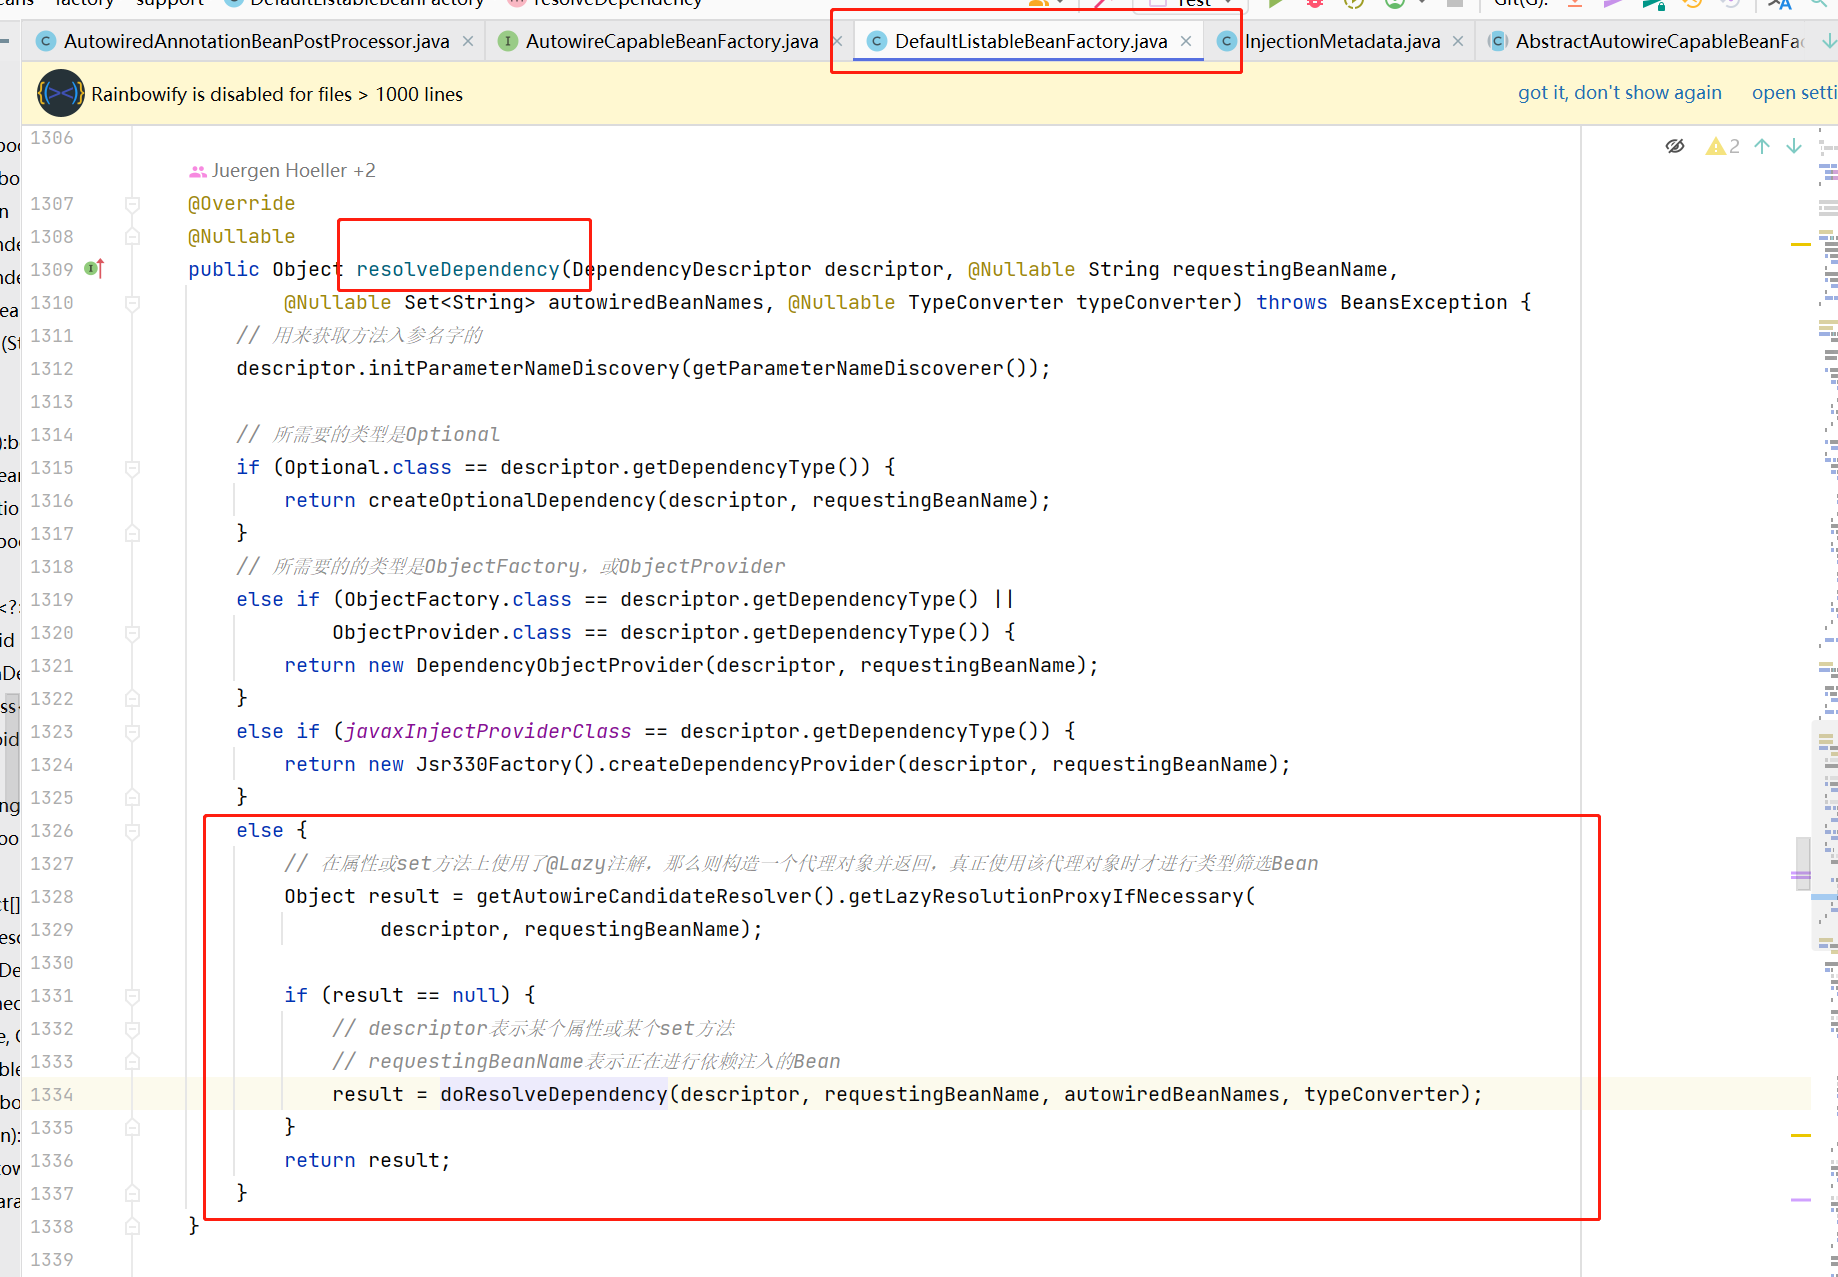
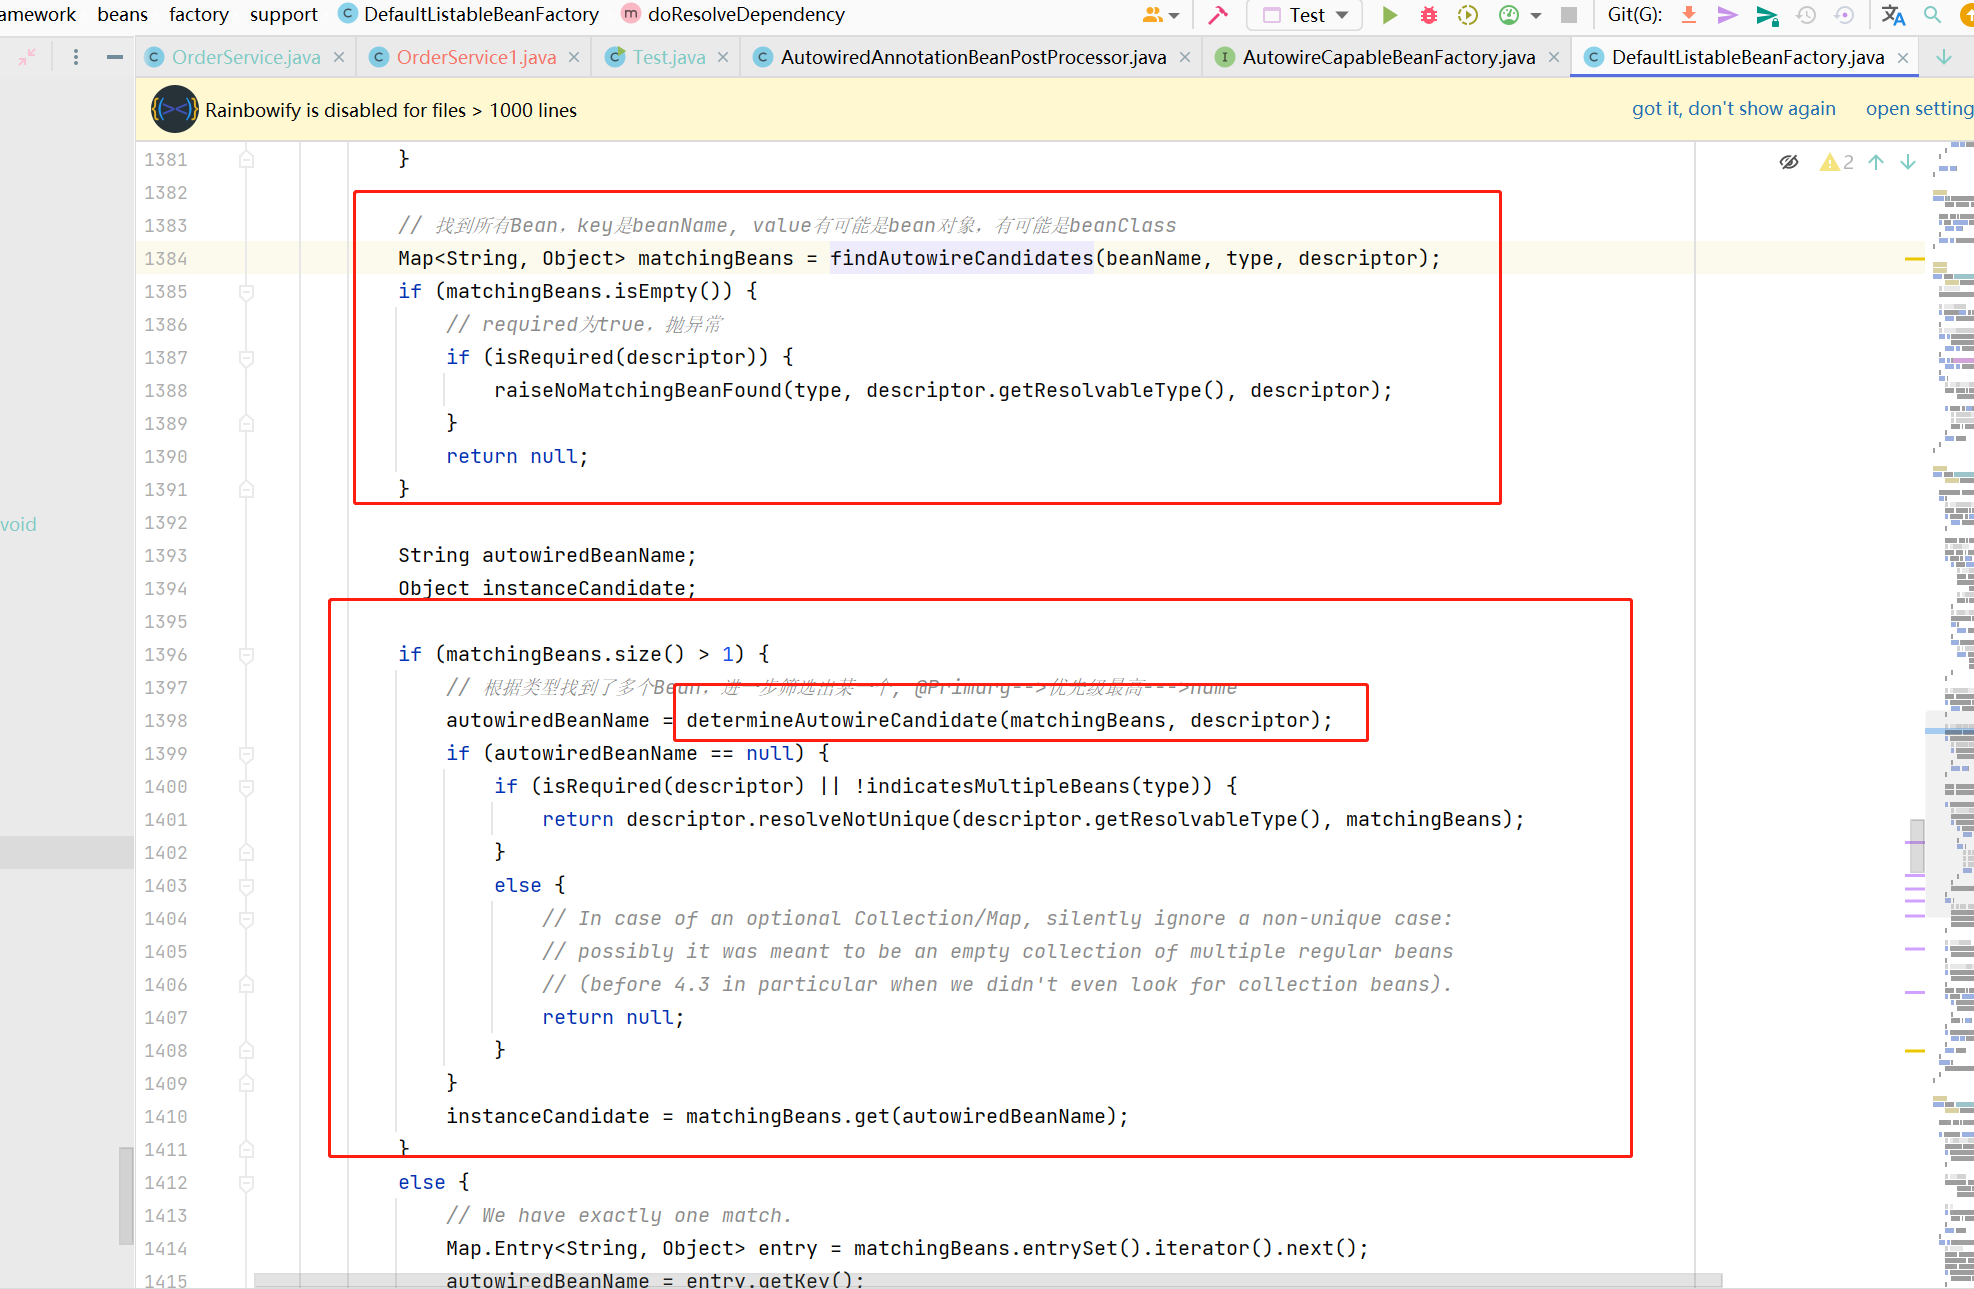
方法代码有点多:
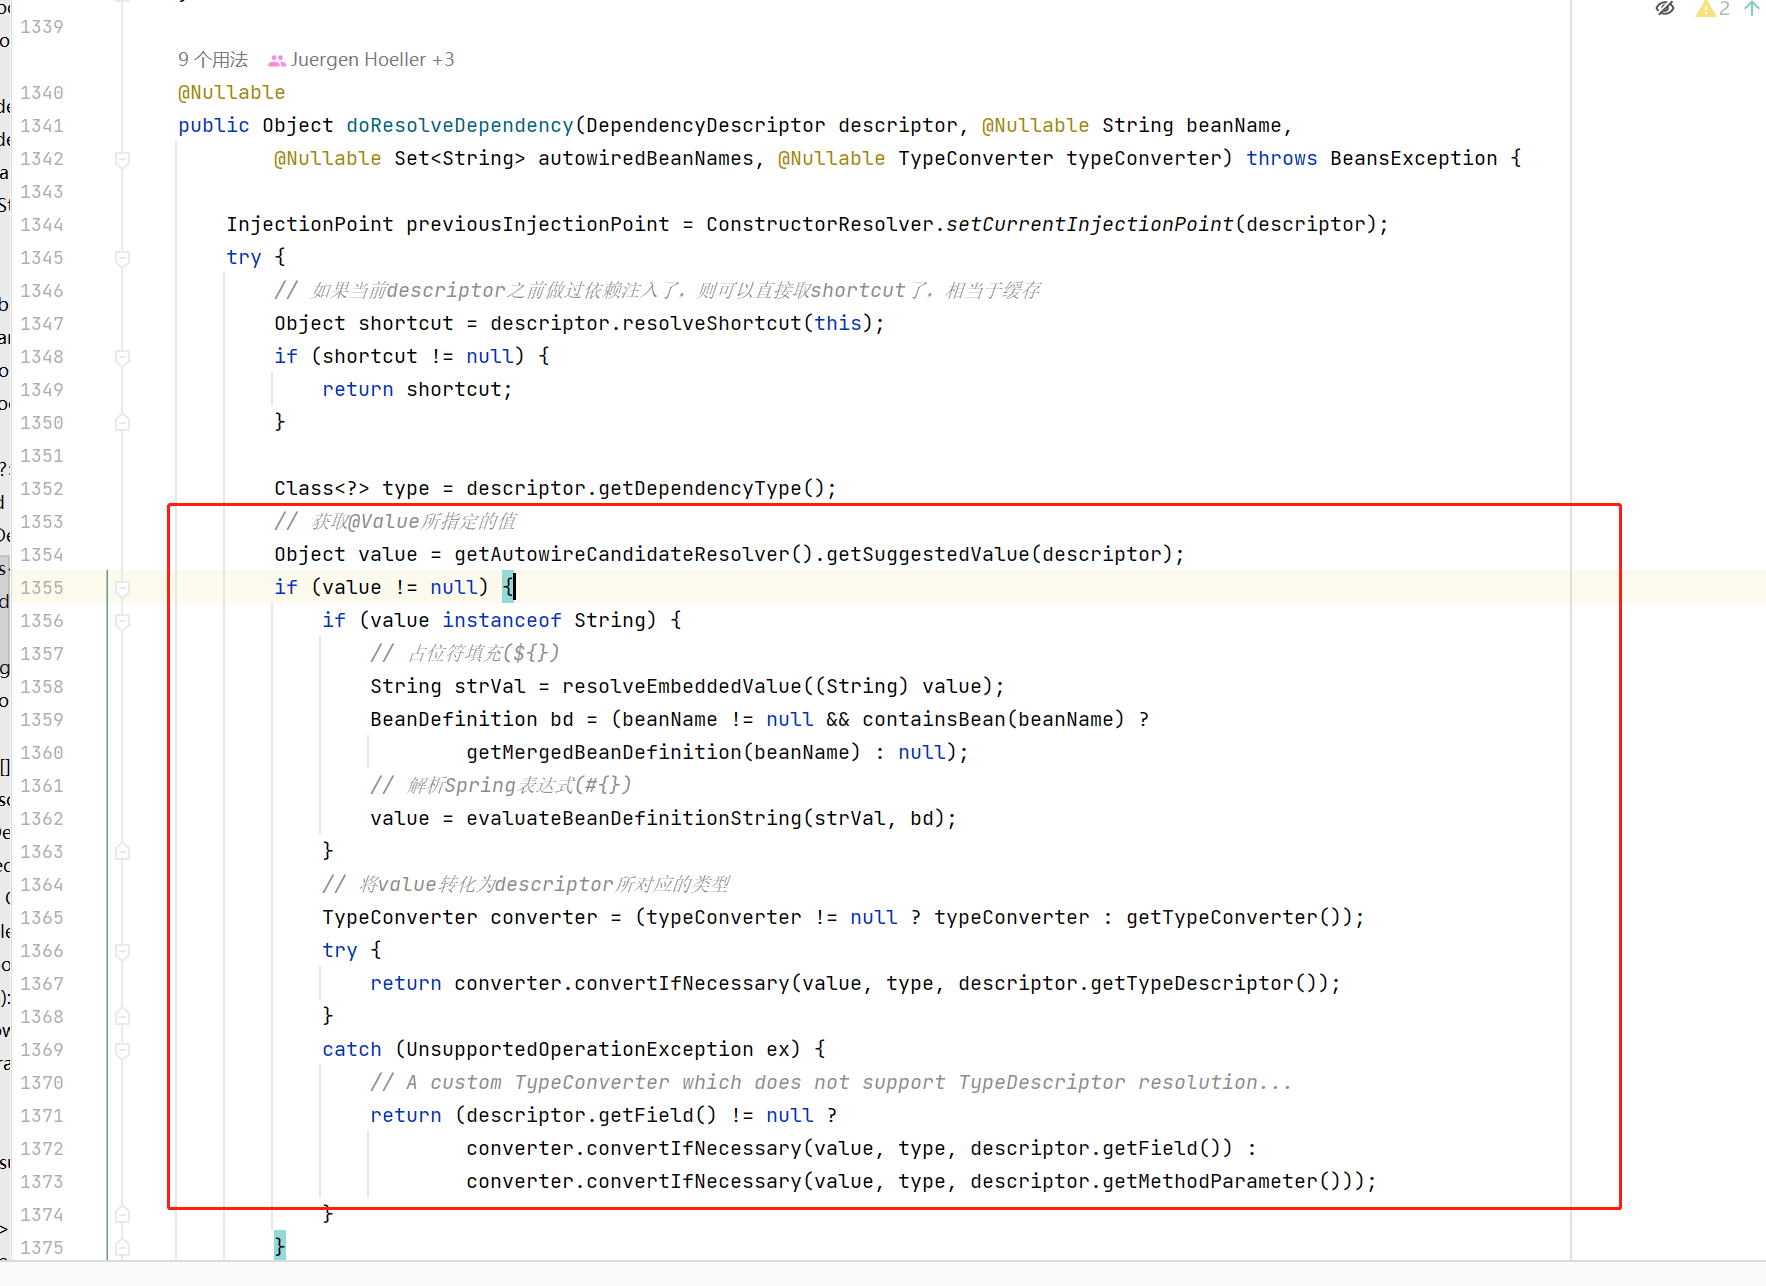

紧接着就是最常见的了,
相关信息
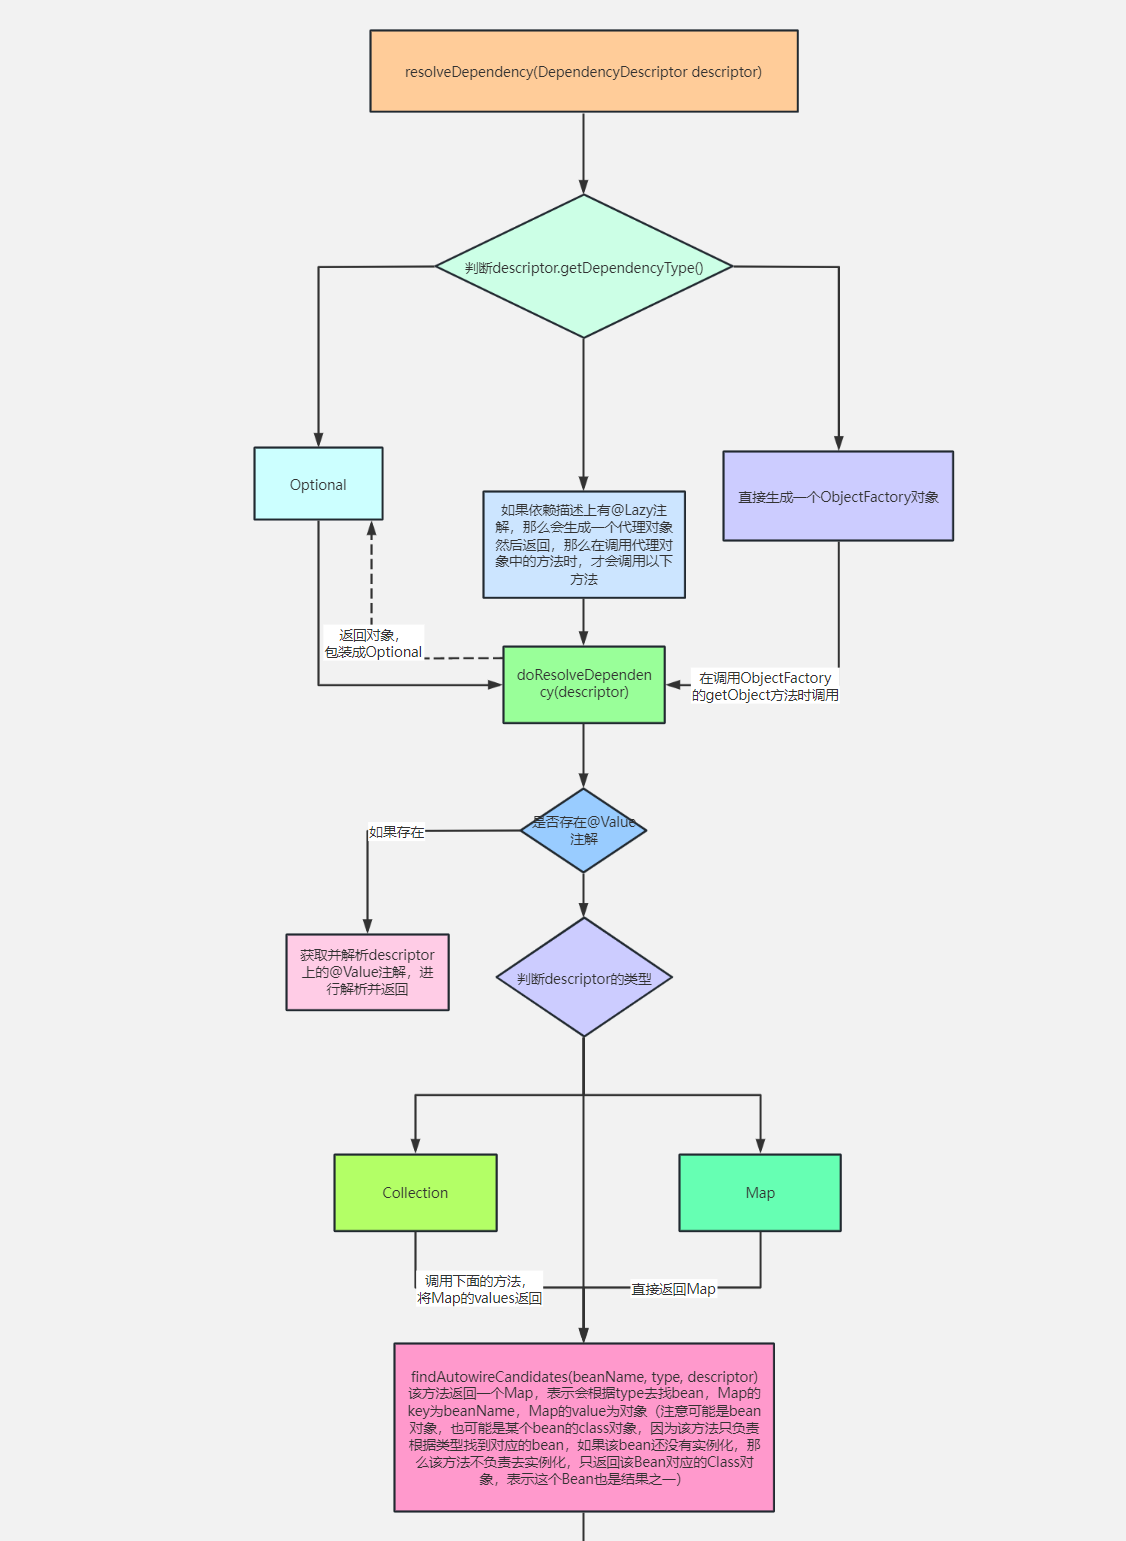
会有6个判断,对应执行流程图为:
https://www.processon.com/view/link/5f8fdfa8e401fd06fd984f20
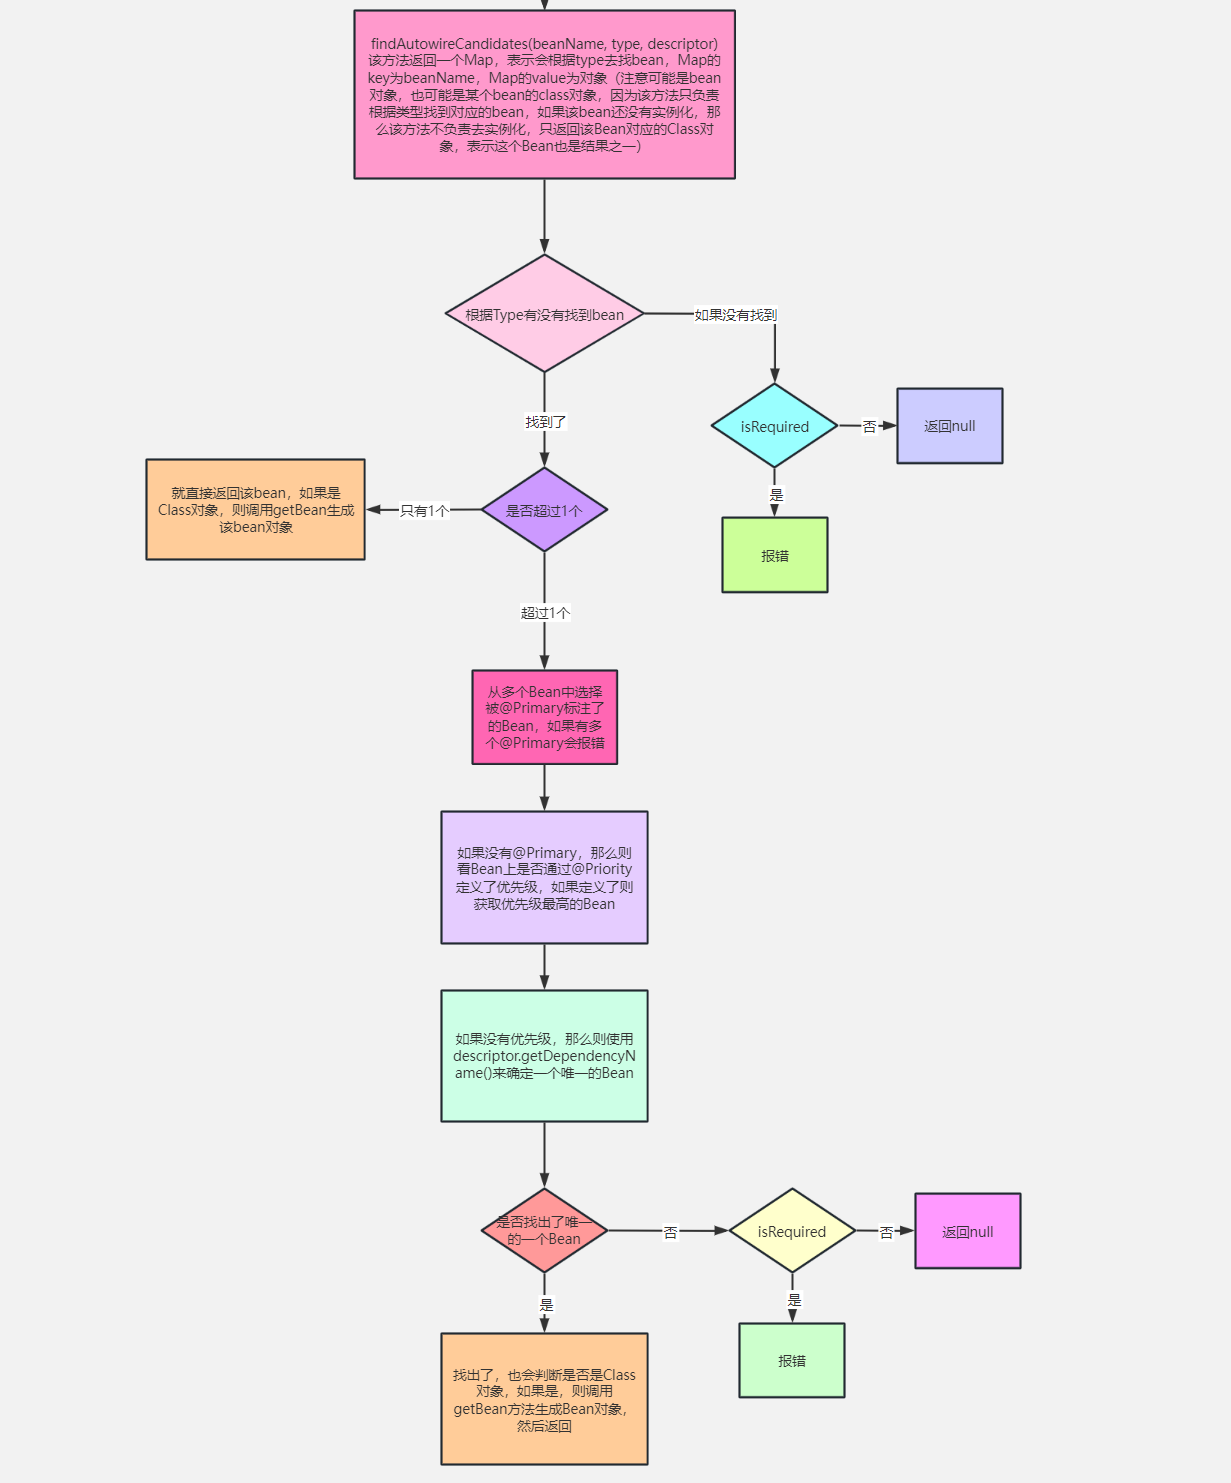
第一个判断:
先判断有没有@,primary注解,有一个就返回,如果有多个就报错,没有则继续找
获取优先级的@priority(1),数字越小优先级越高
注入点的name
根据类型找beanName的底层流程:
https://www.processon.com/view/link/6135bb430e3e7412ecd5d1f2 对应执行流程图为:
https://www.processon.com/view/link/5f8fdfa8e401fd06fd984f20
- 找出BeanFactory中类型为type的所有的Bean的名字,注意是名字,而不是Bean对象,因为我
们可以根据BeanDefinition就能判断和当前type是不是匹配,不用生成Bean对象 - 把resolvableDependencies中key为type的对象找出来并添加到result中
- 遍历根据type找出的beanName,判断当前beanName对应的Bean是不是能够被自动注入
- 先判断beanName对应的BeanDefinition中的autowireCandidate属性,如果为false,表示不
能用来进行自动注入,如果为true则继续进行判断 - 判断当前type是不是泛型,如果是泛型是会把容器中所有的beanName找出来的,如果是这种情
况,那么在这一步中就要获取到泛型的真正类型,然后进行匹配,如果当前beanName和当前泛
型对应的真实类型匹配,那么则继续判断 - 如果当前DependencyDescriptor上存在@Qualifier注解,那么则要判断当前beanName上是否
定义了Qualifier,并且是否和当前DependencyDescriptor上的Qualifier相等,相等则匹配 - 经过上述验证之后,当前beanName才能成为一个可注入的,添加到result中
- ****
- ****
- ********
- ****
- ************
@Resource
不是很难:
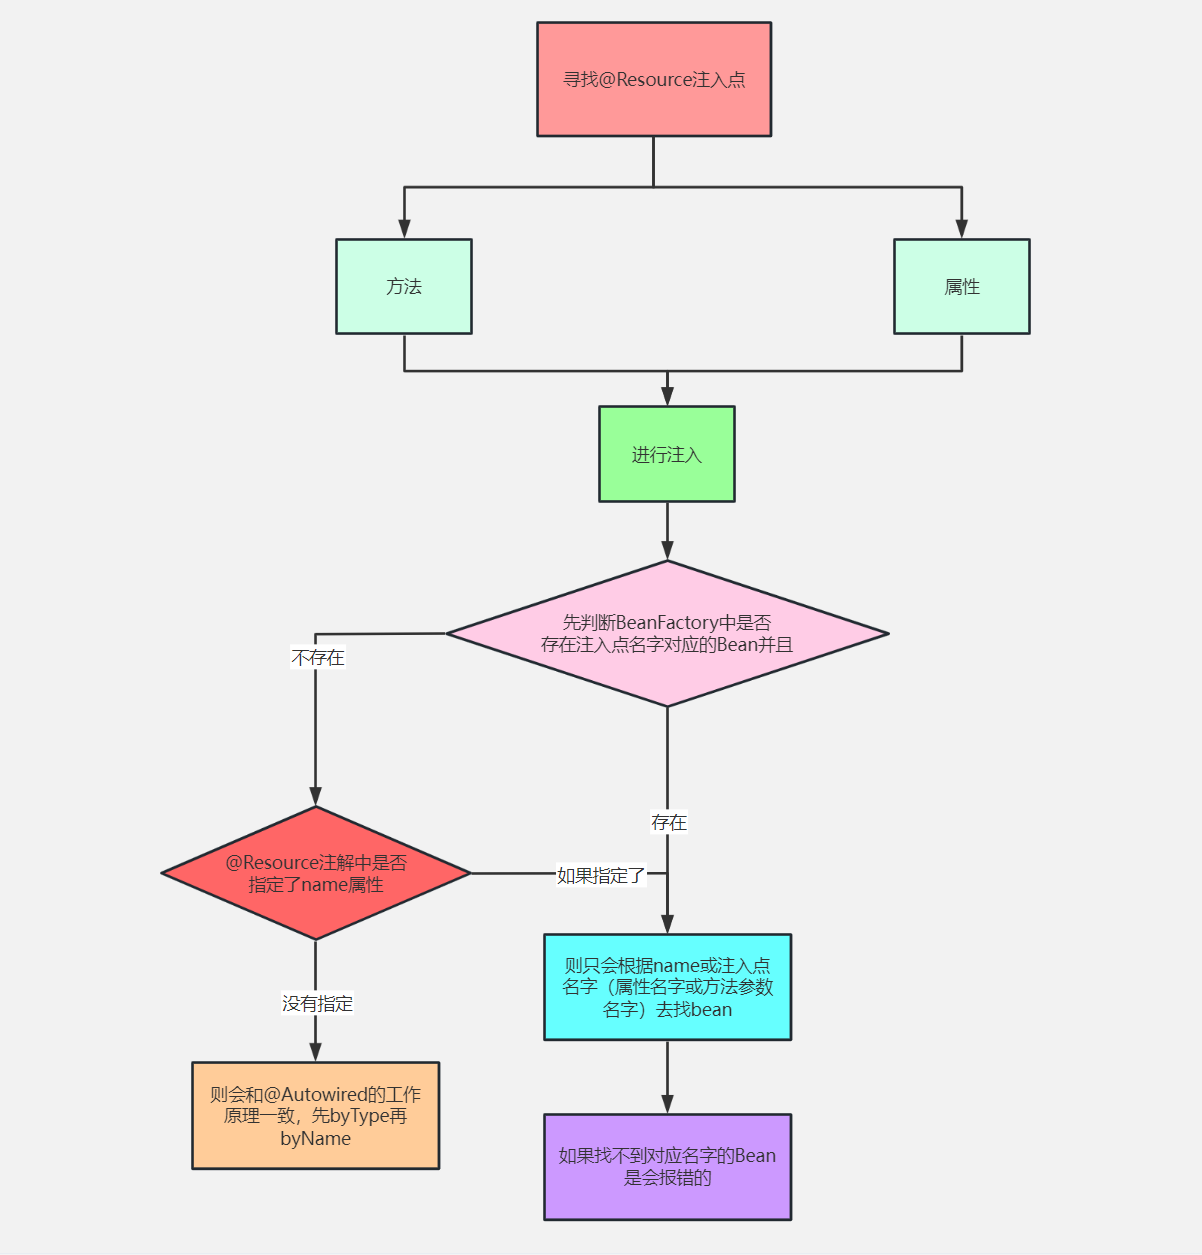
@Resouce注解不是Spring提供的,java规范提供的。
Spring支持@Resouce的意义:能让任何支持@Resouce注解的框架,都能无缝替换Spring,源码不用改。
 晋公网安备 14082402000145 号